Recipes

One Pan Wonder: creamy braised butterbeans with leek, bacon, zucchini and tomato

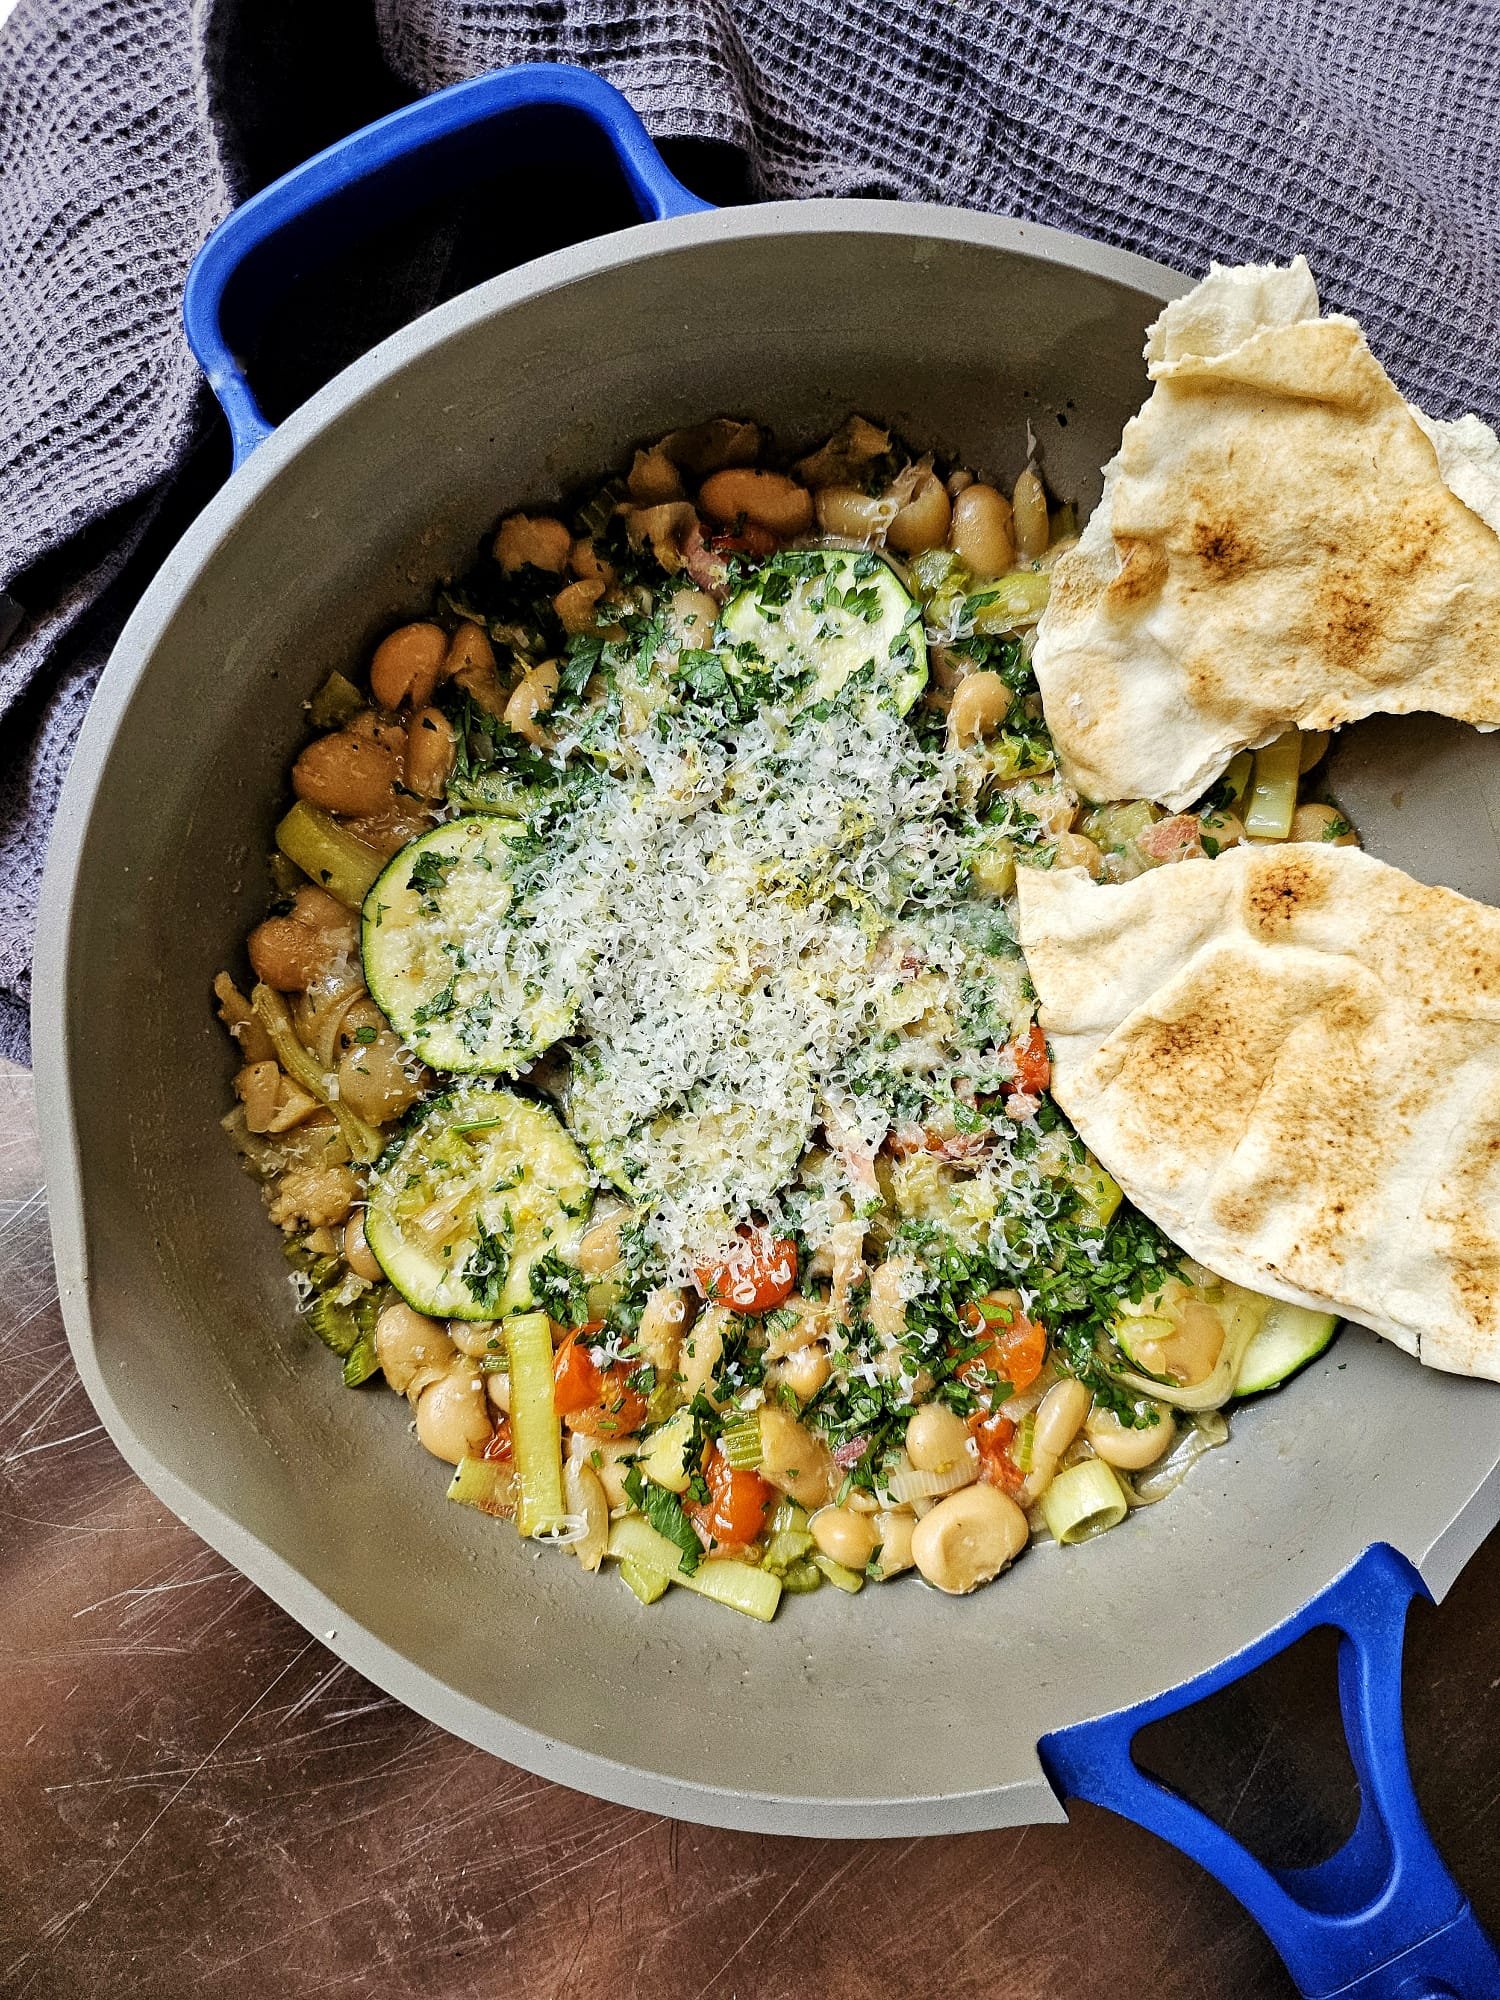
Creamy braised butterbeans with leek, bacon, zucchini, and cherry tomatoes. A satisfying one pan meal that requires very few brain cells to produce, but is big on flavour and satisfaction.

I like to cook dishes like these when I'm tempted to order in, but know I needn't (do better, Mel).

Ingredients

1/2 leek, sliced into 1cm rounds

1 knob butter

1 rasher middle bacon, sliced into matchsticks

1 stalk celery, finely chopped

1 tin butterbeans, rinsed

1 cup chicken stock

1 handful small cherry tomatoes (or regular cherry tomatoes, halved)

1/2 zucchini, sliced into 1/2cm rounds

To serve:

A handful flat leaf parsley, finely chopped

Parmesan, microplaned

1/4 lemon, zested

salt and black pepper, to taste

Method


Soften half a leek sliced into rounds in butter for 1-2 minutes on medium heat, then add in a handful of sliced bacon and a stalk of celery, finely chopped.

Once the celery is translucent, add in a tin of rinsed butterbeans, a cup of chicken broth, and allow to simmer for 10 minutes.

Add in a handful of small cherry tomatoes. When everything starts to soften as one (another 10-15 mins), use the back of a wooden spoon to gently smoosh some of the beans and tomatoes to help it all amalgamate.

Add the sliced zucchini and season to taste with salt and black pepper. Simmer until the broth and beans come together happily in a thick saucy consistency (you'll know).

Finish with finely chopped flat leaf parsley, grated Parmesan, lemon zest, and a subtle blessing of olive oil.

Serve with good bread. We like that stuff.

P.s the super cool blue pan was a gift from Our Place. 💙

Hong Shao Rou - Sticky Red Braised Pork Belly

Hong shao rou, or red braised pork belly, is a lip-stickingly rich, salty-sweet good time and is a classic Hunanese dish. 

hong shao rou red braised pork belly recipe

The pork is blanched, then braised in Chinese cooking wine, a combo of soys and aromats (I used ginger, star anise, fennel seed, cinnamon, nutmeg, white pepper and cardamom)...until you don't think you're ready for this jelly (bootylicious).

The braising liquor is then reduced to a glossy, coating sauce with rock sugar, resulting in shiny, fatty nuggs of happiness, best served with steamed rice and pickled mustard greens. 

Ingredients

700g pork belly, chopped into 3cm chunks, skin on

300ml shaoxing cooking wine

3 star anise

White pepper

1 tsp fennel seeds

3-4 green cardamom pods, lightly bashed

1 cinnamon quill

1 thumb sized piece of ginger, roughly sliced

1/4 cup light soy

1/4 cup dark soy

60g rock sugar

Method

Place the diced pork belly into a pot and cover with cold water. Bring the pork up to a boil and once the scum starts to rise to the surface, immediately drain the pork and rinse well. Scrub the pot to remove any traces of scum, also. 

Place the pork back in the pot, with enough water to cover the bottom of the pot, the add in the shaoxing, aromats and soy (basically, everything but the sugar). 

Bring the liquid to the boil and then turn down to the heat and place a lid on the pot, a little ajar, so that the liquor can evaporate slightly. Simmer for 1.5 hours, or until the fat hat become gelatinous and the flesh is soft. 

Remove the lid, add the rock sugar and bring the contents up to a high boil. Stir thoroughly several times to ensure the sugar is dissolved. Reduce until the liquid is thickened and coats the pork and the bottom of the pot. Everything should be glossy and coated. 

Serve with steamed jasmine rice, Chinese pickled mustard greens, or slices of fresh tomato. 

Pine Mushroom Pasta

FullSizeRender 7.jpg

Is it really winter in Melbourne if you don’t eat pine mushrooms as often as possible? A perfect winter bowl for a rainy Melbourne day.

Sauté one clove finely diced garlic, a few sprigs of thyme and a small eschalot, also finely diced, in a generous knob of butter for 1-2 minutes on medium-high heat, or until translucent. Throw in sliced pine mushrooms with a good slug of olive oil and sauté briefly until the mushrooms are soft and juicy. Season to taste.

Throw in pasta, and toss together with a little pasta water and another small knob of butter, until glossy and combined. Garnish with reggiano, lemon zest, black pepper, parsley and chilli oil (optional).

Pork Shoulder Ragu

A comfort classic that fills the house with the toothsome aroma of slow cooked meaty goodness. Simple, satisfying and one of my favourite ways to spend a lazy Sunday afternoon.

Ingredients

Olive oil

Sea salt

Pepper

1 pork shoulder, skin removed and roughly cut into chunks around 5-7cm 

1 brown onion, peeled and finely diced

3-4 cloves garlic, peeled and finely minced

2 stalks celery, peeled and finely diced

1 carrot, peeled and finely diced

3-4 ribbons of lemon peel

3-4 sprigs thyme 

1 tin crushed tomatoes (or you can slow roast a punnet of cherry tomatoes if they’re going south in the fridge to use them up)

2-3 glasses of red wine (you can do this recipe with chicken stock and white wine instead of tomato, and make it a white ragu).

Method

In a large, heavy based pot on a medium to high heat, brown the chunks of pork in olive oil, until golden and sealed on all sides. Be careful not to overcrowd the pan, transferring the sealed pieces to a bowl. 

Once the meat is browned, reduce the pan to a medium heat and add another generous slug of olive oil. Sauté the onion, garlic, celery and carrot until the onion is translucent, then throw in the lemon skin and thyme. 

Return the pork to the pot, then add the tomatoes and wine. Stir to combine, then turn the heat back up to high until it begins to simmer. Season generously with salt and pepper, stir to combine, then reduce to a low heat, place the lid on, propped up with a spoon to allow a small amount of evaporation. Simmer on the stove for 4-6 hours, or if your pot is oven proof, transfer to an oven on 120c for the same amount of time, the top loosely covered with foil. 

The pork is ready when you can use a spoon to crush the chunks of pork. Gently smoosh all the pork and incorporate it into the sauce, season to taste. If there is still a lot of liquid left, simmer it on the stove, uncovered, until it is reduced enough to coat the back of a spoon.

To serve: cook the pasta to al dente, reserving 1 cup of pasta water. In a frying pan, spoon as much ragu as you plan to serve, along with a good splash of the pasta water. Bring to a simmer and when the mixture begins to bubble and thicken, throw in the pasta. Toss vigorously, to work the starches, creating a glossy sauce. Taste once again to season, then transfer the pasta to the hot plate. Garnish with microplanes parmigiano reggiano, lemon zest and black pepper.

The Only Veggie Soup Recipe You Will Ever Need

Zucchini Miso Soup.jpg

My zucchini patch is still going gangbusters. We’ve done Zuni pickles, roasted, raw in salads, the works.⁣
⁣⁣
Zucchs aside, this is a damn good (and very simple) recipe you can adapt to other veg you might have lying around. Things like carrots, potatoes, fennel, celeriac and pumpkin are PERFECT for it, so feel free to sub out the zucchini for any combo of these, and take veggie soup from alright, to ALRIGHT!!
⁣⁣
Ingredients⁣⁣
⁣⁣
3 tablespoons vegetable oil ⁣⁣
⁣⁣
3 cloves of garlic, peeled and finely chopped⁣⁣
⁣⁣
2 brown onions, peeled and coarsely chopped⁣⁣
⁣⁣
1 teaspoon sea salt ⁣⁣
⁣⁣
1 teaspoon ground white pepper ⁣⁣
⁣⁣
2 tablespoons white miso paste⁣⁣
⁣⁣
4 large zucchini, cut into chunks⁣⁣
⁣⁣
Enough rich chicken or vegetable stock to cover solids (about 1.5L)⁣⁣
⁣⁣
50g butter (substitute with olive oil to make this vegan)⁣⁣
⁣⁣
2 tablespoons good quality EVO (I love @altoolives)⁣⁣
⁣⁣
Method⁣⁣
⁣⁣
In a large saucepan, heat the 3 tablespoons of oil over low heat. Add the garlic, onion, salt, pepper, and, stir to combine and bring the heat up to medium. Sauté until the onions are translucent, but haven't taken on colour. Add the zucchini and cook for a further 5 minutes. ⁣⁣
⁣⁣
Add in the miso paste and then pour in enough stock to cover the vegetables. Bring to a simmer, then cover and cook until the vegetables collapse under the pressure of a spoon. ⁣⁣
⁣⁣
Carefully remove the pot from the stove, add the butter and then and using a stick blender, blitz until smooth. ⁣⁣
⁣⁣
Taste to season and serve (this one’s with a drizzle of green herb oil, yoghurt, dried zucchini flowers and dehydrated olive).

Chinese-style Egg White Omelette with Prawns, Chilli and Mushroom Floss

Chinese Eggwhite Omelette with Prawn, Caviar and Mushroom Floss

I fell back in love with egg white omelettes recently because there are only so many meringues you can make when the yolks are being used for custard or mayo (hellooooo holiday season!). The upside is, that egg whites are high in protein, low in fat and make for some super fluffy omelettes and scrambles aside, if you don’t want to head to Pavlova Town.

This recipe was inspired by an amazing brunch dish served by the very talented chef duo of Jemma Whiteman and Mike Eggert at their restaurant pop up Pinbone in Sydney’s Woollahra; a light, yet complex and indulgent combo of Chinese-style omelette - golden and crunchy on the edges and base, fluffy and cloud-like on top; capped with prawns, mushroom floss (more on this later), and because I was feeling extra, some Yarra Valley golden caviar as well.

Despite looking fancy, it’s actually a very quick and simple dish to make; and a total winner on your next brunch table. Perfect on its own, but also fantastic with a bowl of steamed rice on the side.

Ingredients

Serves 2 as a decent breakfast, or 4 as part of a brunch meal.

1/2 long red chilli, finely sliced

1 thumb sized piece of ginger, smashed

1 garlic clove, smashed

6 -8 large king prawns, peeled, deveined and halved lengthways.

1 shallot (scallion), green part finely sliced

4 egg whites

Mushroom floss (a flavour bomb of umami, made by dehydrating mushrooms - there are also meat versions available at most Asian grocers; pork floss being the most commonly available). This is a garnish and not completely necessary, though highly recommended.

Trout roe (again, not crucial, but it amps up the luxe factor)

Vegetable oil

Salt

White Pepper, finely ground

Method

Heat a small, non stick frying pan to a medium-high heat. Once hot, and add a teaspoon of vegetable oil and the chillis. Fry for around a minute, then remove the chillis from the pan and set aside. Add a little more oil to the pan, then throw in the ginger and garlic, and stir fry for a minute, to allow their flavours to infuse the oil. Add in the prawn meat, allowing it to lightly colour before flipping. Cook for about 2 minutes, until they’re almost fully opaque, but not quite- you don’t want them cooked all the way through, as they will continue to cook once placed in the omelette. Remove the prawns, and set aside. Discard the garlic and ginger. Remove the pan from heat for a moment.

In a blender, place the egg whites, a good pinch of salt and white pepper and blitz for about 30 seconds, until frothy. Going back to the stove, place the frying pan on medium high heat. Once hot, add a generous slug of vegetable oil. This is what will make the edges go golden and crispy, so don’t be afraid to use more than you think you should (this dish is very low in fat, you can stand to use a little more oil in the cooking for the right result). Once the oil starts to shimmer, carefully pour in the egg whites. The edges should start to bubble crisp. You can use a spatula to loosen the edges if you get a little paranoid of sticking.

Once the omelette is almost set in the middle, gently arrange the prawns on top. Allow the omelette to set for another 30 seconds or so (you don’t want it to be fully cooked solid). Using a spatula, gently ease the omelette onto a serving plate. Garnish with the spring onions, the fried chili, mushroom floss and caviar. Add a few drops of olive oil and an extra pinch of salt flakes to finish, and serve immediately.

Ù Tridd: The Pasta From Puglia You Need To Know

Ù Tridd Puglia Pasta

My mother Vincenza is a bit of a legend. She cooks food that seems so simple, yet is layered and nuanced and cooked with so much soul. This is a recipe from her mother Rose, it’s called ù tridd. It’s essentially a hand torn southern style pasta, laced with fresh parsley; similar to stracci (which literally translates into ‘rags’ or ‘tatters’).

Of course, you can swap out the water for stock or add garlic and more herbs to add another dimension of flavour, but then again, why mess with an OG Italian Nonna recipe? The origins of this recipe are from the Tatolli family’s town of Molfetta, which is part of the Puglia region of Southern Italy. As such, this recipe is rooted in humble ingredients; you won’t find rich butter, cream, truffles or other luxury ingredients here. Clean and simple, this is a case study in soul food.

Ingredients

The pasta

3 cups fine semolina

3 cups Tipo 00 pasta flour (plain flour will suffice if needed)

4 eggs

1 handful continental parsley leaves, finely chopped

1 - 1 1/4 cups lukewarm water (as needed)

Extra flour to roll out

The broth

2 veal shins (you can also use lamb shanks or beef ossobuco)

2 carrots, peeled and roughly chopped

2 celery stalks, peeled and roughly chopped

1 large brown onion, peeled and quartered

1 few sprigs of fresh parsley

500ml tomato sugo

Salt and pepper to taste

Finely grated Parmigiano Reggiano, to serve

Method

For the pasta, in the bowl of a stand mixer with a dough hook attachment, add the semolina, flour and eggs and turn the mixer on a low setting. When combined, add the parsley and continue to mix until combined. Gradually add water until the dough comes together. Continue mixing until the dough is no longer sticky and has become soft and pliable. Turn the dough out onto a clean, lightly floured surface and roll the dough into a log roughly 50cm long and 20cm wide. Cut sections around 3cm and pass them through a pasta roller several times so that the dough is smooth and uniform in thickness (around setting 3-4). Set aside to dry for at least 2 hours on wooden dowels… a clothes drying rack will also suffice! Once dry, tear the pasta sheets unto small pieces around the size of your pinky thumbprint. The beauty of this dish is that you don’t have to be too careful, just make sure the pieces are roughly the same size. Set aside to continue to dry out until ready to use. This pasta can be completely dried out and stored for later use.

For the broth, bring a heavy based saucepan or pot to a medium high heat and add a good slug of olive oil. When the pan is hot, sear the shanks until lightly browned on all sides. Throw in the carrots, celery and onion and parsley and stir to combine. Cook for about 3-4 minutes until the onion starts to go translucent. Pour in the sugo and then top with enough water to cover the shanks. Bring to the boil, season liberally with salt and freshly ground black pepper, then reduce to a low heat, cover and simmer for 90 minutes. Skim any fat if necessary. Season again to taste at the end. When the shanks are falling apart, strain the liquid from the solids. Reserve the meat, lightly shred, then set aside.

To serve, bring a pot of salted water to the boil. Once boiling, throw in a good handful of the pasta per person and cook for 4-5 minutes or until tender. Strain and refresh in cold water. In a separate pot, bring the deliciously meaty tomato broth to the boil. Add the cooked pasta and the shredded meat. Season to taste, then serve immediately, topped with finely grated Parmigiano Reggiano, or any sharp, hard Italian cheese, some freshly cracked black pepper and chopped parsley, if desired.


Warm Peach Pudding

Baked Peach Pudding Fooderati

Everybody needs a simple, please everybody pudding you can quickly throw together when entertaining, or just because. This baked pudding is part cake, part cobbler, with golden, almost crunchy bits on the outside and fabulously crumbly and cakey on the inside. And the best bit is you can use any fresh or tinned fruit you like. You could even swirl a few spoons of your favourite jam in, instead! 

Batter

125g butter, softened 

125g caster sugar

2 large free range eggs

125g self raising flour 

Pinch of salt 

Syrup

2 tablespoons brown sugar 

120ml water

1 vanilla pod

Fruit of choice, I used 3 large fresh peaches, but you could you can use almost any fruit you like. Stone fruit, citrus, pears or poached quinces work well. 

Method 

Preheat oven to 180c. Meanwhile, combine the butter, sugar and eggs in a stand mixer and whisk until thick and glossy. Sift in flour gradually and combine thoroughly. 

Thoroughly combine the syrup ingredients in a saucepan, add the fruit and poach over a medium heat for 5 minutes, tossing the fruit around so that it is evenly covered in the syrup. Transfer most of the poached fruit and a spoonful of the syrup to a lightly greased and floured baking dish. Spoon the batter over the top of the fruit and shake the pan a little bit so that everything settles evenly. Add the rest of the fruit on top, nestling it in a little. 

Bake for 30 minutes. Let rest for a few minutes before serving. Serve warm with whipped cream, custard or ice cream. 


Dan Dan Noodles

DanDanNoodles.jpg

I truly believe I have a separate stomach for dumplings and noodles. Not so much for cake, but definitely for savoury things of the Asian persuasion. One of my favourite quick lunches in Melbourne is Le Ho Fook's take on Dan Dan Noodles...a dish from Sichuan origins, with a recipe that is notoriously fought over for whose is better and/or more authentic. This is by no means the most legit version you will find out there, but it's a faithful enough representation that's easy to pull off at home without too much trouble, with delicious results. Enjoy! 

Ingredients:

Noodle sauce

3 tbsp tahini

1 tbsp sesame oil

1 tbsp light soy

1 tbsp Chinese black vinegar

2 tbsp Lao Gan Ma chilli flakes in oil

1 tbsp Mushroom XO sauce

1 bird's eye chilli, finely chopped

2 tbsp Sichuan peppercorns, toasted and blitzed

1 tbsp mild chilli flakes

1/2 tsp Japanese togarishi powder

1/2 tsp ground white pepper

Castor sugar, to taste

125ml chicken or vegetable stock, added as needed

Seasoned mince

1 large thumb-sized piece of ginger, finely chopped

2 cloves garlic, peeled and finely chopped

500g pork mince (not too lean!)

2 tbsp Shaoxing Chinese cooking wine

1 tbsp dark soy

3-4 tbsp ya cai (Sichuan pickles, from Asian grocers and regular supermarkets), finely chopped

The rest

Guan Miao dried noodles (or fresh medium width lo mien noodles, from Asian grocers)

1 bunch bok choy, blanched and refreshed

2-3 stalks spring onion (scallions), finely chopped into trounds

1 small Lebanese cucumber, julienned

Japanese togarashi powder

For the noodle sauce, combine all ingredients except for the stock and mix well. Add the stock, a  little at a time, until you reach a smooth, spoon-coating texture (like runny honey). Season to taste with sugar, salt or chilli, but it should be spicy and numbing. 

For the mince, add vegetable oil, ginger and garlic to a pan on medium high heat and continually move the ginger and garlic around to minimise it sticking to the pan. Once fragrant (about 1 minute), add the mince and brown in batches if necessary. Add Shaoxing wine and soy and season to taste. Transfer the mince to a bowl and stir fry the pickles in a little more vegetable oil for 1-2 minutes. Combine with the mince and set aside to cool. 

When ready to eat, bring a large pot of water to the boil and add the noodles. Cook until al dente, then drain and refresh in cold water. Transfer to a large bowl and spoon over enough noodle dressing to coat the noodles. Transfer into bowls and add the blanched bok choy. Top with the mince and garnish with the spring onions, cucumber, togarashi...you can add some fried shallots or peanuts for extra crunch, too.


Beef Rendang Meat Pies

Almost every culture in the world has a meat pie and this is another one to add to your delicious repertoire. #BringBackTheClassics

Makes: About 8 party pies

Preparation time: 40 minutes

Cooking time: 4 hours 20 minutes

Level of difficulty: medium

Ingredients

Rendang paste
1 tbs coriander seeds
2 thumb-sized pieces of fresh turmeric
1 generous knob of galangal, peeled and coarsely chopped
2 red eschallots, peeled and halved
3 bird's eye chillis (de-seeded if you prefer a milder heat)
1 thumb-sized piece of ginger, coarsely chopped
1/2 stalk of lemongrass, coarsely chopped
2 green shallots (scallions), topped and tailed
1 tsp white mustard seeds
½ cinnamon stick
1 candlenut

The rest
500 g beef oyster blade, chopped into bite sized chunks (beef chuck, lamb neck or shanks also work well)
270 ml tin coconut cream
1 tbs kecap manis

Salt

White pepper

4 sheets short crust pastry

¼ milk for glazing

Crispy chilli oil, or your favourite sauce, to serve

Method

Preheat an oven to 180˚C. Blitz the paste ingredients in the blender or food processor until you achieve a rough paste (add a small amount of water to the paste if it has issues combining). In a heavy based pot on a medium heat, add a slug of olive oil and stir fry the paste for 2-3 minutes, until aromatic. Stir the mixture continuously to prevent it catching on the bottom. Remove the paste from the pot and set aside while you brown the meat. 

Add a little more oil, then in batches, brown the meat on all sides. Once all the meat is browned, return all of the meat to the pot, along with the paste and stir to combine. Add in the coconut cream and ketchup manis and combine well. Bring the curry to a simmer, taste and season with salt and ground white pepper and place the lid on the pot. Place the pot in oven and reduce the temperature to 120˚C for 4 hours.

When the time is up, remove the pot from the oven and check the meat. The meat should be soft enough to break apart with a spoon. When the meat is done, place the pot on the stove on high heat with the lid on for 15-20 minutes to reduce the sauce and thicken the texture. Once thickened, taste and adjust seasoning if necessary, then set aside to cool. Refrigerate overnight if possible.

When you’re ready to make your pies, preheat the oven to 200˚C. Thaw the pastry and cut it to fit the base and sides of your pie moulds. For party pies, a deep muffin tray works well. Fill each pastry case with the rendang and top with a pastry lid. Use a fork to crimp the edges to seal, then glaze with milk. Cook for 20 minutes or until the tops are golden. Set aside to cool slightly, then serve.

Note

Make the rendang a day ahead and refrigerate it…it’ll be easier to work with while slightly cold, and next day stews always taste better!

SBS cook’s notes

Oven temperatures are for conventional; if using fan-forced (convection), reduce the temperature by 20˚C. | We use Australian tablespoons and cups: 1 teaspoon equals 5 ml; 1 tablespoon equals 20 ml; 1 cup equals 250 ml. | All herbs are fresh (unless specified) and cups are lightly packed. | All vegetables are medium size and peeled, unless specified. | All eggs are 55–60 g, unless specified.

 Photography, styling and food preparation by Melissa Leong

Feeling nostalgic? We want you! For the month of November, SBS Food is asking food lovers far and wide to get creative by putting a multicultural twist or your creative spin on an Australian classic... Welcome to #BringBackTheClassics - enter now!


Tom Yum Sausage Rolls

Adding a Thai twist to one of Australia’s favourite meaty pastries, lemongrass and ginger add zing, while the shrimp paste and coriander adds to that savour flavour we all love. Best of all, you already know this recipe…just add (tom) YUM!

Makes: About 16 rolls 

Preparation time: 15 minutes

Cooking time: 25 minutes

Chilling/freezing time: 20 minutes

Level of difficulty: easy

Ingredients

 500 g pork and veal mince

2 tbsp tom yum paste

1 small carrot, peeled and finely chopped

1 brown onion, peeled and finely chopped

1 stick celery, finely chopped

1 clove garlic, minced

1 tbsp potato starch

½ tsp ground white pepper

2 sheets frozen puff pastry, partially thawed

1 egg

Nuoc cham (or if you’re feeling super Aussie, sweet chilli) sauce, to serve

Method

In a large mixing bowl, combine the mince, tom yum paste, carrot, onion, celery, garlic, potato starch and white pepper and mix well with clean hands to combine until everything is emulsified. Throwing the mixture vigorously against the side of the bowl or on a clean bench top will help. Work quickly, keeping the mixture as cool as possible, then cover and refrigerate until needed. When you are ready to assemble, place a sheet of thawed puff pastry onto a clean surface and cut in half, lengthways.

Remove the sausage mixture from the fridge and roll a log about 2.5cm in thickness and place it lengthways onto the pastry, closer to one edge. Carefully roll the pastry, making sure the filling is snug to the pastry with no gaps, and seal the edge where the pastry meets with egg yolk. Set aside in freezer to allow the mixture to firm up.

Repeat until you have used all of the filling. When ready to cook, preheat the oven to 200˚C. Remove the sausage roll logs from the freezer and allow them to thaw slightly. Cut into desired size, brush with remaining egg yolk and place on a baking tray lined with baking paper.

Bake for 20 minutes or until the pastry is golden. Set aside to cool slightly, then watch them disappear!

Note

Tom yum paste can be found in the Asian aisle of most major supermarkets and Asian grocery stores. Because the paste is very salty, there’s no real need to season with additional salt. These sausage rolls work really from frozen to the oven, so make a batch ahead of time and just pop them in the oven when unexpected hungry visitors come calling.


Vegan Chocolate Mousse

Vegan Chocolate Mousse.jpg

Instagram is a wonderful thing for inspiration. It's also terrible for creating unrealistic expectations about everything from diet to body image, but that's a conversation for another time. A dear friend and chef Sharon Salloum from Sydney's Almond Bar (if you haven't been, you really should) recently posted a vegan chocolate mousse she had made. Being a chef and then running into health issues is never ideal, but it happens more than you think. Having to change what we eat out of necessity does create an opportunity to explore new things however, and while I could never EVER be vegan, that isn't to say that recipes that don't involve animal products can't be delicious. Case in point, this extremely rich and velvety chocolate mousse. Chances are you already have most of these ingredients at home anyway, so why no, eh?

Serves 2

Ingredients

1 ripe avocado

1/2 frozen banana

2 tbs cacao powder

1 tbs vanilla protein powder (I used Tropeaka Lean Protein, but this isn't a sponsored post)

1 tsp maple syrup or rice malt syrup (you could use raw honey for a vegetarian option if you don't want to go fully fledged vegan)

1 pinch sea salt

1 tbs coconut yoghurt or almond milk (optional, if the ingredients get a bit too thick to blend)

Cacao nibs and other fun things, for garnish

Method

Throw all your mousse ingredients into a high speed blender. Blitz until smooth (here's a recipe where 'rustic' chunks of avo probably aren't so appealing). The frozen banana means the mousse is pretty much ready to eat out of the blender, but I recommend decanting it into a bowl and chilling it in the refrigerator for about 20 minutes or until ready to eat. Garnish with your favourite toppings and a little extra pinch of sea salt. 


Lentils with Bacon, Chilli Oil and Fried Shallots

As published in Good Food

As published in Good Food

It can be so tempting these days when you're feeling lazy and hungry, to pick up the phone, tap on an app and order delivery. It's not bad, and there are definitely times where the convenience of take out can really save you. There is something to be said though, for developing an arsenal of super fast recipes that you can whip up at a few minute's notice, and let's be frank, are probably a lot healthier and more satisfying than take out. 

Good Food Story September 2017

I was recently asked for Good Food what I'd do with a tin of lentils... so here 'tis! It takes about 10 minutes from go to whoah and is full of protein, fibre and of course, a tonne of flavour. 

Ingredients

1/2 brown onion, peeled and finely diced

1-2 cloves garlic, minced

1 rasher bacon, diced

1 tin lentils, drained and washed

1 cup chicken stock

2 tablespoons Greek yoghurt

1 teaspoon chilli flakes in oil

Fried shallots for garnish

Coriander leaves for garnish

In a frying pan on medium heat, sweat the onion, bacon and garlic in a little olive oil for 2 minutes or until the onion is translucent. Add the lentils and stir to combine everything. Pour in the stock, reduce the heat to low and allow to simmer for 5 minutes or until the stock has mostly evaporated. Set aside to cool slightly. On a serving plate, spread the yoghurt over the base, the spoon over the lentils. Top with the fried shallots and chilli oil and coriander leaves and serve.

Stinging Nettle Soup

Nettle Soup.jpg

Green things are making an appearance in vegetable town...spring has mercifully rolled around and what a glorious thing that is for the litany of new season vegetables to have at your cooking disposal. Over the weekend, a friend dropped off a box of incredible spring vegetables from a Victorian producer that supplies his restaurant, and among the emerald harvest, a huge bunch of stinging nettles. 

I love a produce box challenge, because it really lays out the gauntlet for testing your cooking skills...or failing that, your research ability. Stinging nettles are one of those ingredients that make a miraculous transformation from shitty weed to verdant edible without too much trouble or expense. Have some latex gloves handy to avoid the burn, but here's a classic nettle soup recipe you can test out...whether yours are found at the farmer's market...or your next nature walk (just be sure to wash thoroughly and go slightly off the track if there are dogs around!).

Ingredients

50g butter

1 brown onion, peeled and chopped

1/2 leek, thoroughly washed and chopped

2 carrots, peeled and chopped

4-5 medium potatoes, washed, peeled and chopped into 1 inch cubes

1 bunch spinach or kale leaves (optional)

1 bunch stinging nettles, washed and any woody stems removed

2-3 cups chicken or vegetable stock

Salt and pepper

Method

In a large pot on a medium heat, add the butter and once melted, add the onion, leek, carrot and potato. Sauté for 2-3 minutes or until the vegetables have softened but haven't taken on any colour. Add in 1/2 each of the greens and nettle leaves and sauté until slightly wilted. Add stock and season with salt, then simmer for 15-20minutes or until the potato is is cooked through. Add in the remaining greens and nettles (reserving some greens till the end will ensure a more vibrant green soup). Carefully remove the soup from heat and using a stick blender, blitz until smooth. 

Return the soup to the heat and reduce to your desired consistency and season to taste. Serve with a dollop of Greek yoghurt or creme fraiche. 

Fast and Furious Raid-The-Fridge Leftovers Fried Rice

As seen on Channel 10's The Cook's Pantry with chef Matt Sinclair

As seen on Channel 10's The Cook's Pantry with chef Matt Sinclair

Nobody in the history or cooking rice, ever makes exactly the amount they need. There are always leftovers, which are perfect for making fried rice. I love this dish because it makes short work of throwing together a hot and delicious meal and is a resourceful way of using up leftovers and elevating vegetables that are perhaps past their prime, to new heights. This is a great meal for anytime of the day, from a quick and nutritious snack, to a full-on feast. Add it to your mid week arsenal! 

Serves 2 as a main meal or 4 as part of a feast

Ingredients

2 rashers middle bacon, rind removed, coarsely chopped

1 thumb sized piece ginger, finely chopped

2 cloves garlic, finely chopped

2 stalks shallot (scallion), trimmed and finely chopped

2-3 cups day old boiled/rice cooker rice

1 cup leftover veggies, chopped into 1cm pieces (leftover roasted veg like carrots and Brussels sprouts are great, as are frozen peas or tinned corn)

1 tablespoon kecap manis

1 tablespoon Lau Gan Ma chilli flakes in oil

2 free range eggs, lightly whisked with a fork

Salt and white pepper

A handful fresh beansprouts, to garnish

Method

In a hot wok, add the bacon and stir fry until golden. Add in the ginger, garlic and shallot and stir fry until translucent, but not browned. Throw in the rice and use the spatula to break it up to remove any clumps, then stir fry for 2-3 minutes to allow the rice to take on the flavours and reheat.

Throw in the vegetables, then the kecap manis and chilli flakes in oil (to taste). Bring the wok back up to a high heat, then, in a gradual ribbon, pour in the egg, tossing/stir frying the ingredients constantly, to evenly distribute the egg throughout the rice. The egg will cook very quickly and will continue to cook off the heat from the residual heat in the wok, so it’s important not to overcook. Season with salt and pepper to taste and remove from heat. Serve with fresh beansprouts and more chilli oil on top. 

To make this dish more substantial, or to use up any leftovers, you could also add in leftover cooked meat such as roasted chicken or pork, or tofu.

(sorta) Chinese Chicken Stew

Chinese chicken stew.jpg

One of my favourite places to eat in Melbourne is Dainty Sichuan Hot Pot. There is nothing much better on a cold winter's night than sitting in front of a bubbling yin yang pot of aromatic stock, dipping your favourite meats and vegetables into the boiling broth, then slurping the flavour-laden soupy goodness at the end. My go-to broth at Dainty is spicy chicken; it's chock full of numbing Sichuan pepper, herbal ginseng and a tonne of chilli. I love it so much that I decided to use it as a basis of inspiration to make my (sorta) Chinese chicken stew. It's warming, aromatic, as spicy as you like it, and with the addition of fistfuls of Asian mushrooms and tofu, it's a comforting and substantial meal that will make your house smell brilliant and your belly happy. 

The process involves roasting and then stewing. Why the extra step? More flavour, la! While it's true that you could probably throw the chicken in and cook it down without the roasting step, all those roasty chilli flavours and caramelised chicken skin give a greater depth of flavour in the overall dish, plus you kind of get two recipes for one if you stop at the roasted chicken, so what's not to love?

Ingredients

For the Chinese roast chicken part

1 large brown onion, peeled and sliced into 1.5cm rounds

1 free range, organic chicken (you get what you pay for)

1 tablespoon vegetable oil

1/2 teaspoon sesame oil

1 thumb sized piece ginger, smashed

4-5 cloves garlic, smashed

2 star anise

1 tablespoon chilli flakes

1 teaspoon Sichuan peppercorns

1 teaspoon pink peppercorns

1/2 teaspoon white pepper, ground

2 long, red chillis, chopped in half, widthways

4-5 cloves, whole

For the stew

1 thumb sized piece ginger, finely chopped

2 cloves garlic, peeled and finely chopped

1/2 bunch coriander, trimmed and chopped (stems and leaves) - reserve some leaves for garnish

3 cups chicken stock

1 tablespoon Thai fermented chilli paste (or anything with a heap of dried shrimp and chilli in it)

1 tablespoons Lau Gan Ma chilli flakes in oil

2 teaspoons kecap manis

3 cups mixed Asian mushrooms (I like a combo of black fungus, shittake, enoki and shimeji)

1/2 block firm tofu, cubed into 1.5cm pieces

Steamed rice, to serve

Method

Chinese roast chicken.jpg

Preheat an oven to 200c. In a baking tray, place the onion slices evenly in the centre, as this will act as a trivet for your chicken (as well as add flavour). Thoroughly wash the chicken, pat the skin dry with paper towel and place the chicken on top of the onions. Pour over the vegetable and sesame oils and rub the entire outside of the skin, to evenly coat. Place the ginger and one star anise in the cavity and the garlic in the roasting tray. 

Sprinkle the chilli flakes and peppers, over the chicken, rubbing all over, to evenly coat. Throw in the remaining anise, fresh chilli and cloves into the baking tray and roast for 25-30 minutes, breast side up, until the skin is golden. Flip the chicken, continue to roast for 10-15 minutes, then turn down the heat to 170c and continue to roast for a further 20 minutes. Remove from oven and set aside until cool enough to handle. You could stop here, and you'd have a pretty cracking Chinese-spiced roast chicken, but we'll crack on, shall we?

In a casserole dish or heavy based pot on a medium heat, add a tablespoon of vegetable oil and the chopped ginger, garlic and coriander. Fry for 1 minute until aromatic, then add in the chicken stock. Once cool enough to handle, chop the chicken into pieces, discarding the central frame (leave the rest of the bones in, I think it gives the stew a better flavour but if you wish, you can remove the skin and meat from the frame and throw that in, sans bones).

Bring a kettle to the boil and pour about half a cup of boiling water into the roasting tray and use a spatula to scrape all the baked on flavours from the sides. Pour all of this spicy, chickeny goodness, along with any chunks of roasted onion and chilli, into the pot.* Place the roasted chicken pieces into the stock, along with the chilli paste (I'm obsessed with this one), chilli oil and kecap manis. Bring to the pot to a simmer, stir to combine and season to taste. After 5-10 minutes, add in the mushrooms and tofu, stir to combine, then reduce the heat and continue to simmer to reduce the stock to a thick, stewy consistency. Season to taste, then set aside to cool slightly. 

Serve with steamed rice, or if you like, mix the rice and the stew together, then serve. Garnish with fresh coriander. This will, as with any soup, stew or curry, taste better the next day. 

*This step will not only add a greater depth of flavour to your stew, but get you a head start on clean up. 


Pozole Verde

pozole verde

Every now and again, I become obsessed with a certain dish I'm introduced to. Case in point, Melbourne restaurant Mamasita's hugely underrated menu item, pozole. For the uninitiated, it's essentially a spicy Mexican soupy stew, usually made with maize grits (hominy), meat (chicken or pork) and flavoured with jalapeños, garlic, coriander and served, poured over shredded lettuce, avocado and radishes - so it's kind of like a soup and a salad in one bowl.

Mamasita's pozole sits there on the menu, largely overlooked in preference for more sexy and conspicuously Mexican dishes such as their delightful tacos de lengua (ox tongue tacos), but that's our loss. It's rich, soothing, spicy and basically the perfect warming soup for the cooler months, that maintains that bright, spicy, savoury, earthy flavour profile we love about Mexican cuisine. 

Here is an admittedly not-so-authentic (however delicious) version of pozole verde (this dish also comes in a red, or rojo version, aromatic with ancho and arbol chillies). It's at once light, bright and spicy flavours, but also rich and comforting. 

Ingredients

1 organic chicken

1 brown onion, peeled and roughly chopped

3-4 cloves garlic, peeled and sliced

1 tablespoon coriander seeds

1 tablespoon cumin seeds

2 tablespoons dried oregano

1 lime

2 green capsicums

2 fresh jalapeño chillis, tops trimmed

2 long green chillis, tops trimmed

1 tablespoon of chipotle in adobo (any good Latin or gourmet grocer will stock this)

1 x 400g tin cannelini beans, washed and drained (a substitute for hominy, mainly to thicken)

2 bunches coriander, washed thoroughly

1 tbs pickled jalapeños, drained

200g  tin tomatillos (if you can't get these, just use more cooking liquid from the chicken)

1/2 a ripe avocado, sliced just before serving

1/4 head of iceberg lettuce, shredded

3 red radishes, mandolined into thin slices, set aside in a bowl of water

1-2 tbs Greek yoghurt

A handful good quality tortilla chips (or you can fry corn tortillas in a little oil). I like the ones by La Tortilleria

Sea salt

Black pepper

Olive oil

Method

Wash the chicken inside and out, pat dry and set aside. In a large, heavy based pot on a medium heat, add a tablespoon of olive oil, then the chopped onions and garlic. Cook for 1-2 minutes until the onion begins to turn translucent. Add the coriander seeds, cumin seeds and oregano and continue to cook for 2-3 minutes or until fragrant. Add the chicken and enough water to cover it. Cut the lime in half, squeeze in the juice and throw in the squeezed fruit. Cover with a lid and bring the water to the boil. Remove the lid and reduce to a simmer, skimming any scum from the surface regularly.

pozole verde vegetables

Meanwhile, preheat an oven to 180c and line an oven tray with baking paper. Cut the top off each green capsicum and discard, along with the seeds. Place the capsicums cut side down on the tray, along with the green chillis. Feel free to throw in any random green vegetables as well - we added peas and cavolo nero. Drizzle the vegetables with olive oil and salt and the chipotle in adobo and cook for 20-25 minutes or until the vegetables are soft but have still retained their greenness. 

While the vegetables are cooking, place the drained beans onto a baking paper-lined baking tray, drizzle with olive oil and salt, place them in the oven and cook for 20 minutes. Set aside to cool.

Remove the green vegetables from the oven and place them into a blender along with the coriander (reserving a few leaves for garnish), pickled jalapeños and tomatillos. Blitz into a smooth paste, adding a little stock from the cooking chicken to thin out the puree. Season with salt to taste, then set aside to cool. 

Turn the oven up to 200c and once the chicken joints start to feel loose when you tug at them (about 45 minutes), carefully remove the chicken from the pot and place it on a baking paper-lined tray. Season with salt (and a little chipotle in adobo if you like), and roast for 15 minutes or until the skin is golden. Sift out and discard the limes.

Remove the chicken from the oven, allow to cool for a few minutes and then carefully shred the meat. Set aside the bones to make stock (waste, not, want not). Reserve some of the shredded chicken for serving, then add the rest of the chicken meat, skin and cartilage back to the pot with the cooking liquid. Add the roasted cannelini beans, then using a stick blender, carefully blitz the stock, chicken and beans into a smooth puree. Bring to the boil and reduce, if you want a thicker soup consistency. Otherwise, add the green puree to the blended chicken soup and stir well to combine. Taste and season with salt and pepper.

To serve, assemble the reserved shredded chicken, lettuce and sliced avocado in a soup bowl. Pour the hot pozole on top, and garnish with radishes, coriander leaves, a dollop of yoghurt and the tortilla chips. Serve immediately. 

Pasta-free Lasagne with XO

Pasta free lasagne

My Italian mother-in-law would probably have a heart attack for calling something 'lasagne' that contains no pasta, but seeing as my husband made this particular recipe with me, we'll let it slide. We decided to replace the pasta sheets with layers of eggplant and zucchini on account of coming home from the Australian Financial Review Top 100 Restaurant Awards in Sydney after an epic 4 days of eating everything in sight (we went to Sokyo, Billy Kwong, Icebergs, The Dolphin, Hubert, Hubert again, Fratelli Paradiso, Automata, Ester and Din Tai Fung, just so you get the picture) and wanted to eat healthier without feeling like we were missing out on life.  Everything else about this dish is legit though, including the very handy Italian mama kitchen tip of using leftover charcuterie bits and pieces to add depth of flavour to sauces and stews (we used njduia). Add to that the not-very-Italian-mama tip of adding a little XO into sauces that aren't necessarily of Asian influence, and you have one rich, complex sauce that works well on pretty much anything. 

Ingredients

Red sauce

1 leek, washed and finely sliced

3 brown onions, peeled and finely sliced

2-3 cloves garlic, peeled and finely sliced

50g njduia (or any leftover pieces of salami, pancetta or bacon fat, finely chopped)

1/2 bottle of red wine

2 tins crushed tomatoes

1 strong tablespoon of XO paste

Salt &  pepper.


The rest

1 large eggplant, mandolined lengthways into 5mm sheets

2 large zucchinis, mandolined lengthways into 5mm sheets

200g fresh ricotta

1 handful parsley leaves, finely chopped

1 fennel bulb, sliced

Sea salt flakes

Freshly cracked black pepper

Olive oil

Method

Preheat an oven to 180c. For the red sauce, heat a large saucepan on a low to medium heat, then add a good slug of olive oil. Add the leeks, onion and garlic and cook until softened but the vegetables haven't taken on any colour. Take this opportunity to season the base. Add in the njduia (or chosen salumi) to the pan, burying it amongst the vegetables. It'll begin to break down and render the fat out. Once this happens, mix everything vigorously to combine. After another 2-3 minutes, add the wine. Cook over medium high heat until reduced by two thirds and the mixture is glossy and thick. Add the tinned tomatoes and stir to combine. Once boiling, reduce the heat and simmer the sauce until reduced by about half and starts to take on a thick spoon-coating texture. Season with salt, pepper and XO to taste (this gives the sauce an umami punch and an extra dimension of flavour), then remove from heat and carefully transfer to a heatproof blender. Alternatively, you can use an immersion blender on it's highest setting. Blitz the mixture on high into a smooth puree, then set aside to cool slightly. 

Meanwhile, prepare the ricotta filling by combining the ricotta with the chopped parsley in a bowl, mixing well. If the mixture is too thick, add a little olive oil to the mix. Season well with salt and pepper, then set aside. 

Line a baking dish with baking paper. Spread a few spoonfuls of the red sauce into the dish, then top with a layer of eggplant. Top with an even layer of ricotta, then more red sauce, then a layer of zucchini. Continue to alternate layers of eggplant, red sauce, ricotta, and zucchini, finishing with ricotta on top. Lay the fennel slices on top and cover with a layer of baking paper. Transfer the dish to the oven and bake for 30 minutes. Remove the baking paper, turn the oven up to 200c and continue to cook for a further 20-30 minutes or until the top is golden and bubbly. 

Remove the lasagne from the oven and allow to cool and set before slicing, otherwise the whole thing will collapse. Serve the lasagne topped with Parmesan or pecorino, microplaned over the top, and a few basil leaves.

Sticky Chai

IMG_1370.JPG

Let me start by saying that I am NOT an advocate of jumping on the superfood bandwagon. There are of course, ingredients that we know are better or worse for us, and as a food writer, identifying trends or the prevalence of a theme, ingredient or technique is part of the job and what makes something newsworthy (deservedly or not..ahem *cloud eggs*). 

Lately, turmeric has become a huge point of fascination in the western world, though anyone of Indian or South East Asian background might find it comical that this fantastic rhizome has reached 'superfood' status...we knew that already!

Whether fresh or dried, then powdered, this golden-hued wonder can be used in curry pastes, skincare preparations (a mixture of honey, greek yoghurt and turmeric powder makes a GREAT face mask) and gives rice a fragrant scent and a vibrant hue. Its benefits can be enjoyed in a multitude of ways, including soothing inflammation in the body (from arthritis to skin irritation), as a potent antioxidant as well as being anti-bacterial, anti-fungal. Turmeric also has a positive impact on cholesterol (any excuse to validate duck fat in my diet) and aids in digestion and gut health. 

This turmeric recipe is an excellent thing to make and store in your fridge as a paste - add a teaspoon of it to boiling water with a little honey to drink as a tea, brew it with almond milk as a latte, add it to your morning oats, you can even use it as a curry paste! PSA: speaking from personal experience, I would highly advocate wearing black when you cook with turmeric - it stains like crazy.


Ingredients

3-4 pieces of fresh turmeric (about 50g) (you can also use ground turmeric if you can’t find it fresh - about 1 heaped tsp)

1 large knob of fresh ginger, peeled (about 40g)

1 cinnamon quill (or 2 tsp ground)

1 tbs whole black peppercorns

5-7 green cardamom pods

3 star anise

1 whole nutmeg

4-5 whole cloves (or 1/2 tsp ground)

1 heaped tbs honey (you can use maple syrup to make this vegan, or if you prefer the taste)

A pinch sea salt

Method

In a pan on medium high heat, toast the dry spices until aromatic. Add the fresh turmeric and ginger and continue to dry toast for 2-3 minutes, then transfer to a blender (I use a Nutribullet). Blitz into a coarse mixture, the transfer into a bowl. Add honey and salt and combine well. Transfer to a sterilised jar or container and store in the fridge. To brew, heat 1 tsp of mixture per cup or your chosen milk in a small saucepan on the stove until aromatic. You can also add it to your favourite tea infused, top with boiling water and then add your chosen milk (I like oat milk for this), for creaminess. Sweeten to taste.


Gluten Free Gingernut Biscuit Berry Crumble

As seen on Channel 10's The Cook's Pantry

As seen on Channel 10's The Cook's Pantry

A lot of the food I cook for myself at home happens to err on the side of 'healthier'... simply because when I eat out, working on food shows or testing recipes, I'm not exactly going to not the pasta special, spit when judging cheese soufflé, or say no to the foie gras parfait.

IMG_1229.JPG

This berry crumble recipe came about one recent cold night when I felt like something warm and comforting without wanting to go OTT on the indulgence factor. I like to keep frozen berries on hand for smoothies, and quick snacks because they're a great way to get a sweet hit without reaching for the chocolate every time (not to mention, they're a great antioxidant and vitamin boost).

This recipe happens to be gluten free, but if that doesn't bother you, you can always substitute with your favourite sweet biscuits (milk arrowroot or shortbread would be ACE!). If you're dairy free, feel free to replace the butter with coconut oil, but work quickly with your hands, so it doesn't melt completely.

Screen Shot 2017-10-11 at 10.58.16 pm.png

Serves 1 sweet fiend or 2 normal people

Ingredients

3-4 gluten free biscuits

2 tbs almond meal

A good knob of butter

1 pinch ground cinnamon

1 pinch sea salt

1 cup frozen mixed berries

A drizzle of honey

Method

Preheat your oven to 180c. Place the biscuits inside a clean tea towel and using a rolling pin or a heavy saucepan, bash the biscuits up into uneven, crumbly chunks (you could use a food processor, but that'd be far too civilised and quite frankly, you want chunks of biscuit to exist, rather than a fine, uniform crumb). In a bowl, rub together the crushed biscuits, almond meal and butter with your fingers until it comes together as a coarse crumb. Add in the cinnamon and salt and lightly combine. 

Pour the berries into an oven proof ramekin. Drizzle with honey and top with the crumble mixture. Bake for 10-15 minutes or until the top is golden and the berries are bubbling and juicy around the edges of the ramekin. Serve with Greek or coconut yoghurt...or a little double cream if you're feeling like taking it there.