Indulgence

Hong Shao Rou - Sticky Red Braised Pork Belly

Hong shao rou, or red braised pork belly, is a lip-stickingly rich, salty-sweet good time and is a classic Hunanese dish. 

hong shao rou red braised pork belly recipe

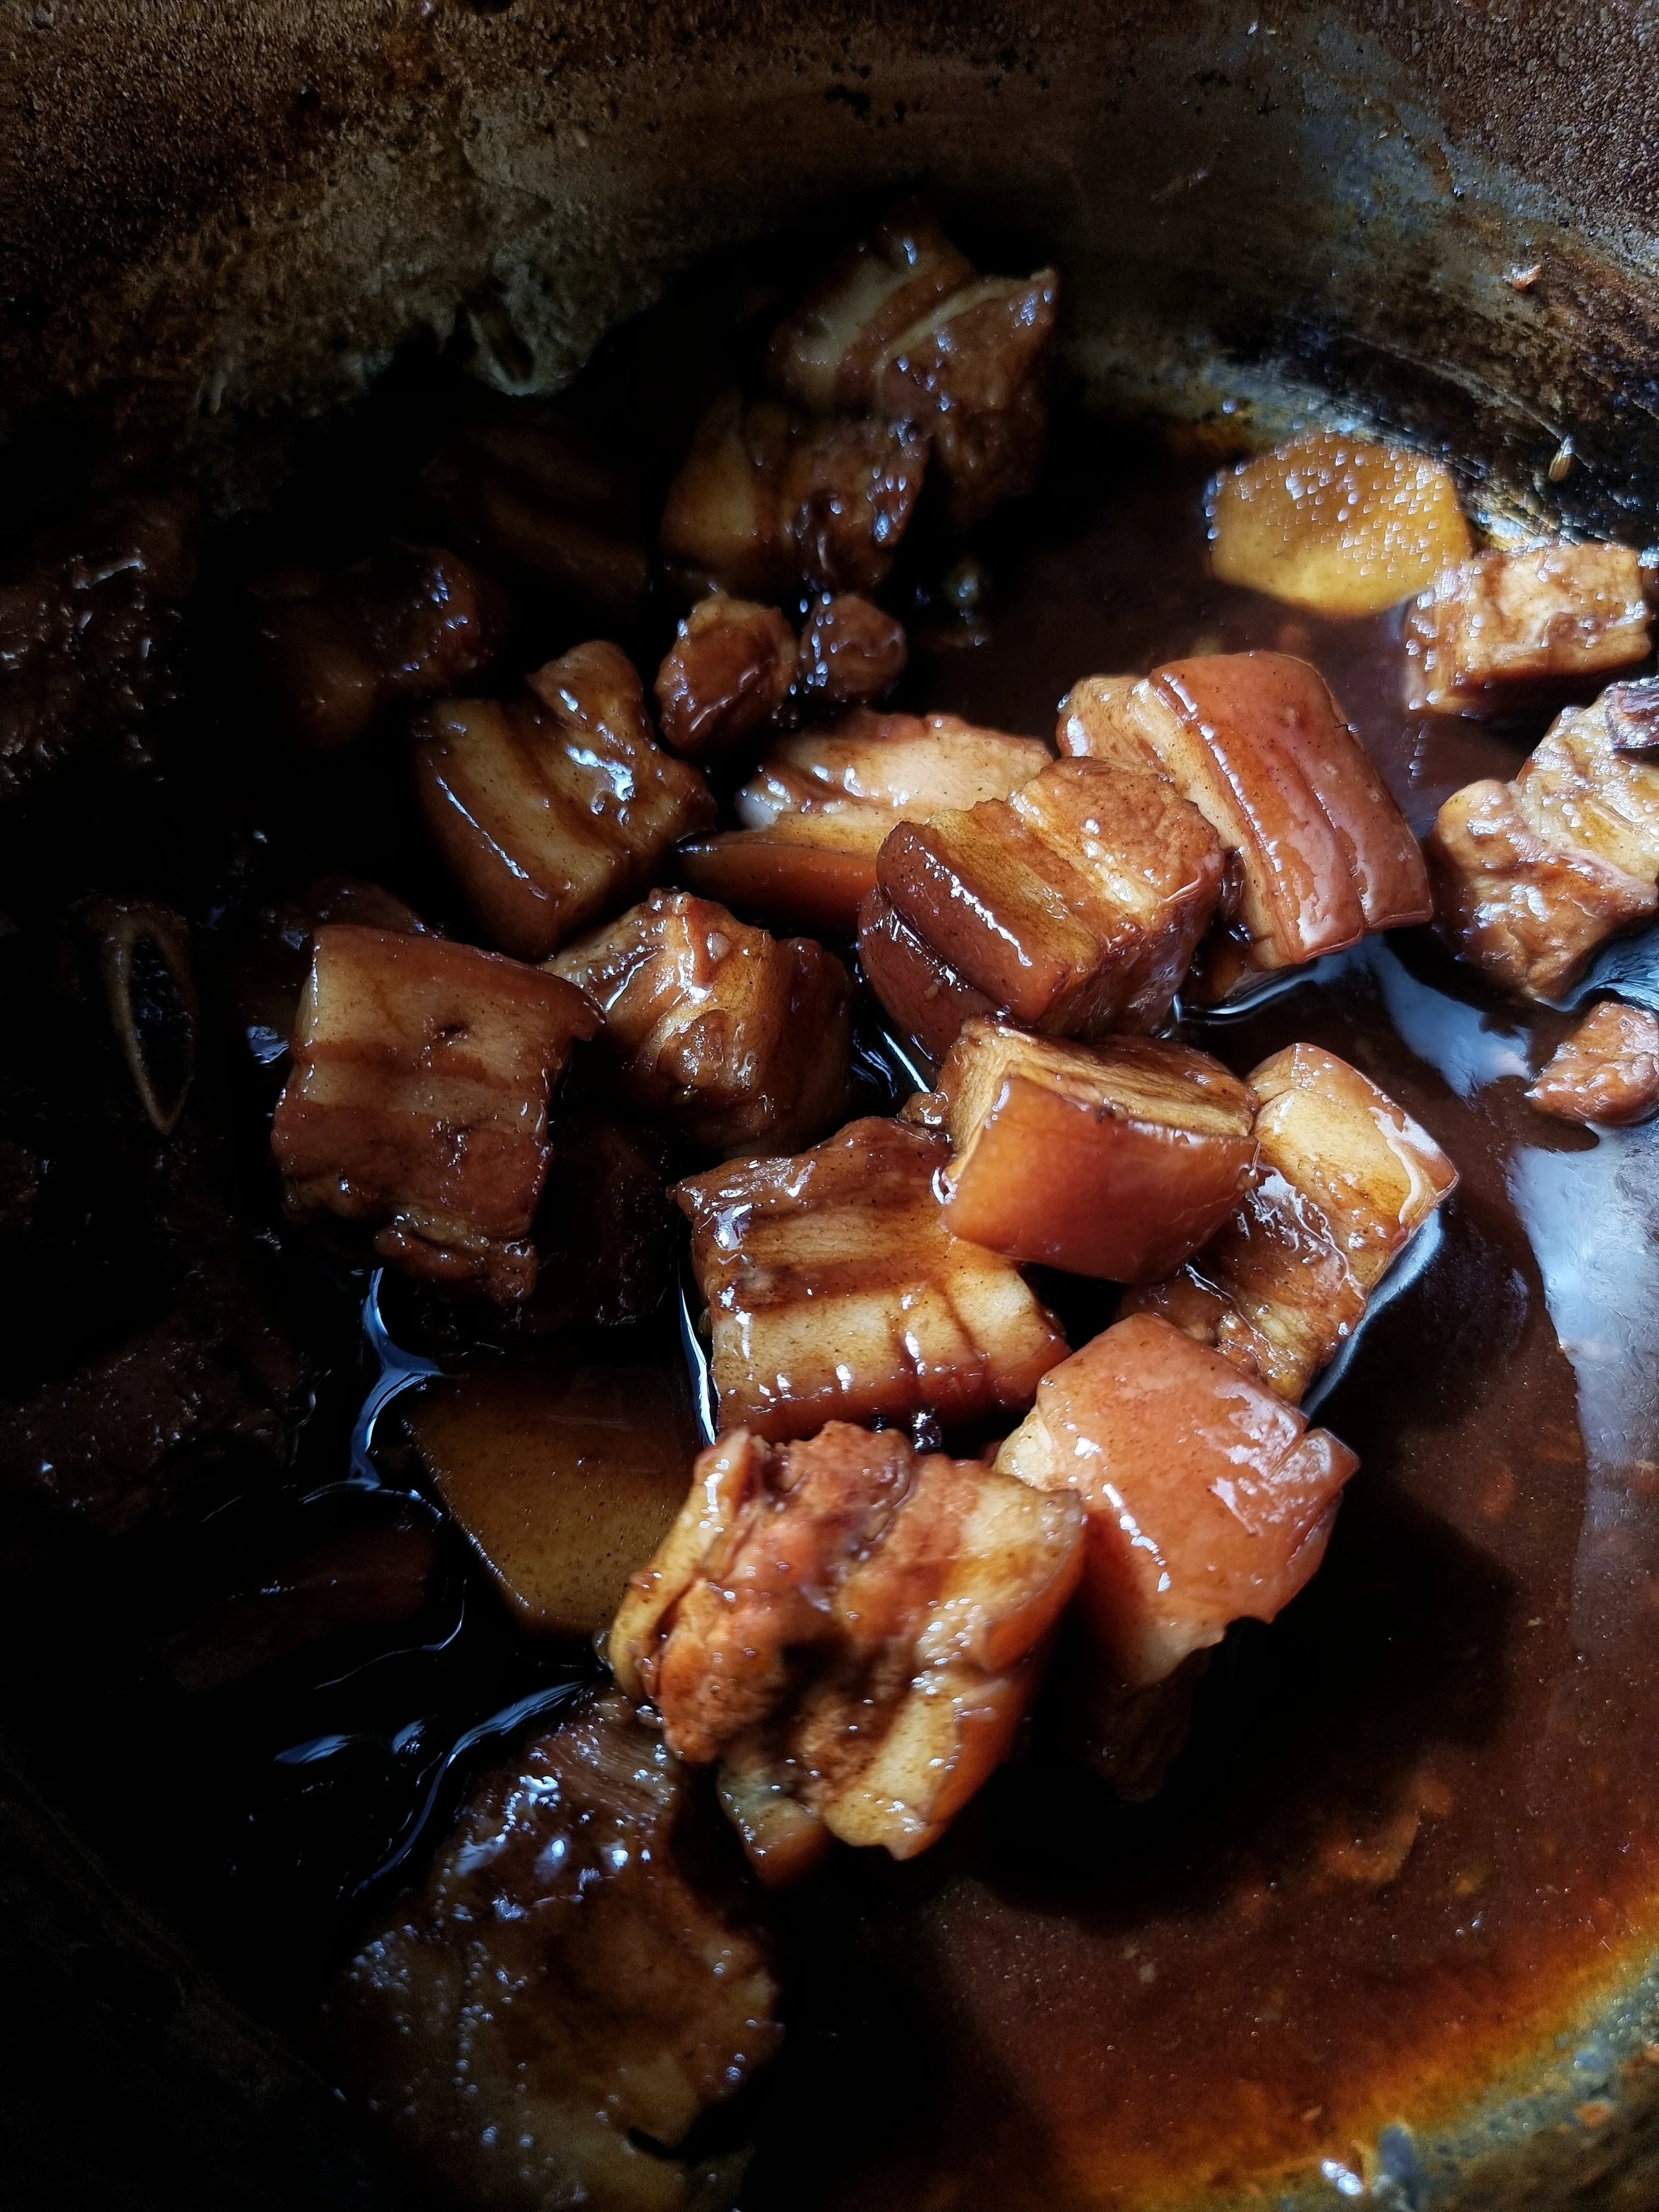
The pork is blanched, then braised in Chinese cooking wine, a combo of soys and aromats (I used ginger, star anise, fennel seed, cinnamon, nutmeg, white pepper and cardamom)...until you don't think you're ready for this jelly (bootylicious).

The braising liquor is then reduced to a glossy, coating sauce with rock sugar, resulting in shiny, fatty nuggs of happiness, best served with steamed rice and pickled mustard greens. 

Ingredients

700g pork belly, chopped into 3cm chunks, skin on

300ml shaoxing cooking wine

3 star anise

White pepper

1 tsp fennel seeds

3-4 green cardamom pods, lightly bashed

1 cinnamon quill

1 thumb sized piece of ginger, roughly sliced

1/4 cup light soy

1/4 cup dark soy

60g rock sugar

Method

Place the diced pork belly into a pot and cover with cold water. Bring the pork up to a boil and once the scum starts to rise to the surface, immediately drain the pork and rinse well. Scrub the pot to remove any traces of scum, also. 

Place the pork back in the pot, with enough water to cover the bottom of the pot, the add in the shaoxing, aromats and soy (basically, everything but the sugar). 

Bring the liquid to the boil and then turn down to the heat and place a lid on the pot, a little ajar, so that the liquor can evaporate slightly. Simmer for 1.5 hours, or until the fat hat become gelatinous and the flesh is soft. 

Remove the lid, add the rock sugar and bring the contents up to a high boil. Stir thoroughly several times to ensure the sugar is dissolved. Reduce until the liquid is thickened and coats the pork and the bottom of the pot. Everything should be glossy and coated. 

Serve with steamed jasmine rice, Chinese pickled mustard greens, or slices of fresh tomato. 

Rapid Fire Apple Crumble...For One!

Super Fast Apple Crumble For One

A lot of recipes are made for more than one...which is fine, but there are times where a perfectly formed meal for one is just the ticket. This super fast dessert came about because solo movie nights sometimes need to be a little extra. This deliciously cute apple crumble is gluten free, refined sugar free and super fast and easy to make, so instead of popcorn, try this!

Ingredients

Filling 

1 apple (I used a pink lady)

1/2 tsp vanilla bean paste

1 tsp Australian honey

1 pinch sea salt

1 pinch cinnamon

Crumble

3 tbs almond meal

1 small knob cold butter

1 pinch sea salt

1 pinch cinnamon

Method

Preheat oven to 200c. Core and chop the apple into 1 inch cubes and transfer to a bowl. Add the remaining ingredients for the filling and toss to combine. Transfer to a small ramekin so that the ingredients fit snugly, adding 2 tablespoons of water. In a separate bowl, combine the almond meal and butter and using a rubbing technique, use your fingers to rub the butter into the almond meal to form a crumb. Add the salt and cinnamon and then top the apple mixture with the crumble. Reduce the oven to 180c and bake for 15-20 minutes or until the top is golden and the apple is tender. Serve with coconut yoghurt and a drizzle of maple syrup if desired. 

Warm Peach Pudding

Baked Peach Pudding Fooderati

Everybody needs a simple, please everybody pudding you can quickly throw together when entertaining, or just because. This baked pudding is part cake, part cobbler, with golden, almost crunchy bits on the outside and fabulously crumbly and cakey on the inside. And the best bit is you can use any fresh or tinned fruit you like. You could even swirl a few spoons of your favourite jam in, instead! 

Batter

125g butter, softened 

125g caster sugar

2 large free range eggs

125g self raising flour 

Pinch of salt 

Syrup

2 tablespoons brown sugar 

120ml water

1 vanilla pod

Fruit of choice, I used 3 large fresh peaches, but you could you can use almost any fruit you like. Stone fruit, citrus, pears or poached quinces work well. 

Method 

Preheat oven to 180c. Meanwhile, combine the butter, sugar and eggs in a stand mixer and whisk until thick and glossy. Sift in flour gradually and combine thoroughly. 

Thoroughly combine the syrup ingredients in a saucepan, add the fruit and poach over a medium heat for 5 minutes, tossing the fruit around so that it is evenly covered in the syrup. Transfer most of the poached fruit and a spoonful of the syrup to a lightly greased and floured baking dish. Spoon the batter over the top of the fruit and shake the pan a little bit so that everything settles evenly. Add the rest of the fruit on top, nestling it in a little. 

Bake for 30 minutes. Let rest for a few minutes before serving. Serve warm with whipped cream, custard or ice cream. 


4 Ingredient No Bake Coconut Crack Bars

As seen on Everyday Gourmet with Justine Schofield and Melissa Leong

As seen on Everyday Gourmet with Justine Schofield and Melissa Leong

A new year rolls around, as does the guilt for potentially overdoing it between Christmas and New Years, even though it's probably worth the argument that it's really what you eat between New Years and Christmas that's more important. 

But anyway, I digress. Once the sugar high from all your favourite end of year desserts comes to an end (personally, I'm a pavlova and trifle girl), here's a slightly more virtuous afternoon tea accompaniment that's vegan as well as gluten, refined sugar and dairy free...but be warned, they are called Crack Bars for a reason. There is zero baking involved and the base recipe is just 4 ingredients (I don't count salt), which you can add your favourite toppings or ingredients like pepitas and raw chocolate (pictured), cacao nibs, dried fruit, etc. Enjoy! 

Ingredients

1 cup dessicated coconut

1/4 cup maple syrup (honey will work, but isn't vegan if that matters)

2 tbsp coconut oil, melted

1/2 tsp vanilla extract

1 pinch sea salt

Optional: a handful of pepitas, raw chocolate to drizzle. 

Method

Place the dessicated coconut into a mixing bowl. In a separate bowl, combine the melted coconut oil, maple syrup and vanilla extract. Add the wet ingredients to the dessicated coconut, along with a good pinch of sea salt and combine well. At this stage, you can add any additional  ingredients you like, for example, a handful of chopped nuts, cacao nibs, pepitas, or dried fruit.

Line a shallow baking tray with baking paper and press the mixture into a level rectangle shape, alternatively you can use silicon ice cube moulds. Freeze the pressed mixture for 10-20 minutes until set, then slice into portions, or pop out of the mould, if using. If you want to drizzle a little melted chocolate (raw or otherwise, I don't discriminate), this is when you'd do that (and let's be honest, when is a little extra chocolate a bad idea?).

Store refrigerated. 


Beef Rendang Meat Pies

Almost every culture in the world has a meat pie and this is another one to add to your delicious repertoire. #BringBackTheClassics

Makes: About 8 party pies

Preparation time: 40 minutes

Cooking time: 4 hours 20 minutes

Level of difficulty: medium

Ingredients

Rendang paste
1 tbs coriander seeds
2 thumb-sized pieces of fresh turmeric
1 generous knob of galangal, peeled and coarsely chopped
2 red eschallots, peeled and halved
3 bird's eye chillis (de-seeded if you prefer a milder heat)
1 thumb-sized piece of ginger, coarsely chopped
1/2 stalk of lemongrass, coarsely chopped
2 green shallots (scallions), topped and tailed
1 tsp white mustard seeds
½ cinnamon stick
1 candlenut

The rest
500 g beef oyster blade, chopped into bite sized chunks (beef chuck, lamb neck or shanks also work well)
270 ml tin coconut cream
1 tbs kecap manis

Salt

White pepper

4 sheets short crust pastry

¼ milk for glazing

Crispy chilli oil, or your favourite sauce, to serve

Method

Preheat an oven to 180˚C. Blitz the paste ingredients in the blender or food processor until you achieve a rough paste (add a small amount of water to the paste if it has issues combining). In a heavy based pot on a medium heat, add a slug of olive oil and stir fry the paste for 2-3 minutes, until aromatic. Stir the mixture continuously to prevent it catching on the bottom. Remove the paste from the pot and set aside while you brown the meat. 

Add a little more oil, then in batches, brown the meat on all sides. Once all the meat is browned, return all of the meat to the pot, along with the paste and stir to combine. Add in the coconut cream and ketchup manis and combine well. Bring the curry to a simmer, taste and season with salt and ground white pepper and place the lid on the pot. Place the pot in oven and reduce the temperature to 120˚C for 4 hours.

When the time is up, remove the pot from the oven and check the meat. The meat should be soft enough to break apart with a spoon. When the meat is done, place the pot on the stove on high heat with the lid on for 15-20 minutes to reduce the sauce and thicken the texture. Once thickened, taste and adjust seasoning if necessary, then set aside to cool. Refrigerate overnight if possible.

When you’re ready to make your pies, preheat the oven to 200˚C. Thaw the pastry and cut it to fit the base and sides of your pie moulds. For party pies, a deep muffin tray works well. Fill each pastry case with the rendang and top with a pastry lid. Use a fork to crimp the edges to seal, then glaze with milk. Cook for 20 minutes or until the tops are golden. Set aside to cool slightly, then serve.

Note

Make the rendang a day ahead and refrigerate it…it’ll be easier to work with while slightly cold, and next day stews always taste better!

SBS cook’s notes

Oven temperatures are for conventional; if using fan-forced (convection), reduce the temperature by 20˚C. | We use Australian tablespoons and cups: 1 teaspoon equals 5 ml; 1 tablespoon equals 20 ml; 1 cup equals 250 ml. | All herbs are fresh (unless specified) and cups are lightly packed. | All vegetables are medium size and peeled, unless specified. | All eggs are 55–60 g, unless specified.

 Photography, styling and food preparation by Melissa Leong

Feeling nostalgic? We want you! For the month of November, SBS Food is asking food lovers far and wide to get creative by putting a multicultural twist or your creative spin on an Australian classic... Welcome to #BringBackTheClassics - enter now!


Marmalade and Ricotta Teacake

Marmalade Ricotta Cake.jpg

When I lived in rural Tasmania for two years, I had the great fortune of living for part of that time on an organic sheep dairy. Owned by my dear mate Nicole Gilliver, her mother Diane Rae and their amazing family, Grandvewe Cheeses is situated in Birchs Bay, located an hour south of Hobart overlooking Bruny Island. 

One of the perks of being mates with a cheesemaker...is obviously access to cheesy delights...including recently, a huge wedge of sheep milk ricotta. With zero preservatives, the shelf life of produce like this is extremely short, and without wanting to waste it, I decided to bake what I didn't use into a ricotta cake. Add to this a couple of tablespoons of my mother in law's excellent home grown cumquat and blood orange marmalade, this cake was made with a whole lotta love. 

It's a not-too-sweet, citrusy slice is great as an afternoon tea accompaniment and is even better served with a dollop of yoghurt or creme fraiche. 

Ingredients

250g fresh ricotta

2/3 cups caster sugar

2 large organic eggs

100g butter, melted

Zest and juice of 2 lemons

1/4 cup orange juice

1/4 cup almond meal

1 1/2 cups self raising flour, sifted

1 pinch salt

1 tsp ground cinnamon

2 tbs marmalade

Icing sugar, for dusting

Greek yoghurt or creme fraiche, to serve

Method

Preheat an oven to 180c. In a food processor, add the ricotta, sugar and eggs and blitz until smooth. Pour in the butter, lemon zest, lemon juice and orange juice and pulse again, to combine. In a clean mixing bowl, add the almond meal, flour, salt and cinnamon and stir to combine. Gently fold the dry ingredients into the wet ingredients, about a third at a time, until combined.

Line a 20cm spring form tin with baking paper and pour the batter into the tin. Shake to level and then carefully swirl in the marmalade, then even out the top. Bake for 35-40 minutes or until a skewer inserted into the centre comes out clean. Allow to cool for 10 minutes before releasing the cake from the springform, and rest on a rack until cool. Dust with icing sugar and serve with yoghurt or creme fraiche. 


Lemon Delicious Tart

Lemon Delicious Tart

It's always useful to have a couple of handy dessert recipes in your arsenal for when you really need to impress...even if the person you're impressing is yourself! A great lemon tart is the perfect combination of zesty, lemony sunshine and buttery richness - a refreshing way to end a meal that's still a little bit indulgent too. This recipe was shared with me by my extremely talented husband; who was a chef at Melbourne pastry gem Chez Dre, somewhere between being a touring guitarist in a metal band and a bar owner. It's been his trusted never-fail-to-impress dessert for many years, and I hazard a guess that if you give it a try, you'll see why.

A few tips - the gelatine leaf literally sets this recipe up for success, don't leave it out. Gelatine leaves can be found in all good food stores and are graded in strength, with titanium giving the firmest hold. Make sure when you zest and juice your lemons that you keep these two separate. Zest is best kept as fresh as possible, so adding it in at the last minute will give you that extra 'pop'. Serve this chilled with a little spoon of creme fraiche or double cream to complement the zing. 

Ingredients

Pastry

2 cups plain flour

150g butter, chilled and cubed

2-3 tablespoons iced water

Curd 

5-6 lemons (you'll need 250ml juice and the zest, but we'll get to that)

250g caster sugar

200g eggs (about 4 medium sized eggs)

200g butter, cubed and chilled

1 sheet titanium strength gelatine

Method

Preheat an oven to 180c. In a food processor, mix together the flour and butter until you achieve a fine crumb texture. With the motor running on low, gradually add the iced water until a smooth dough forms. Turn the dough out onto a lightly floured surface, knead briefly and then wrap in plastic and refrigerate for at least 30 minutes.

Once chilled, roll out pastry onto a lightly floured surface to about 3-4mm thick. Lay over the rolling pin and gently transfer the dough onto pastry tin. Line the case with baking paper and fill the case with blind baking beads (you can also use lentils or rice if you don't have baking beads). Bake for 10 minutes, then remove the weights and continue to bake for another 5-7 minutes or until the inside of the case is light golden in colour. Set aside to cool completely before filling. 

For the lemon filling, zest and juice the lemons. Reserve 250ml lemon juice and the zest separate. To make the lemon curd, place the juice, sugar and eggs in a Thermomix bowl. Cook at 90c for 9 minutes on speed 3. If using a double boiler set up, whisk the lemon juice, sugar and eggs constantly for 10-12 minutes or until the consistency is thick and smooth. Meanwhile, soften the gelatine leaf in iced water for 5 minutes.

When the curd is thick, pour it into a clean bowl, then set it over another bowl filled with iced water. Whisk in the chilled butter, a few cubes at a time until complete combined. Squeeze out the gelatine leaf and add it to the mixture. Continue to whisk until the leaf is completely dissolved. Once the curd has cooled to about room temperature, pour into the pastry shell and set aside in the fridge for one hour. Keep refrigerated until serving. 

Gluten Free Gingernut Biscuit Berry Crumble

As seen on Channel 10's The Cook's Pantry

As seen on Channel 10's The Cook's Pantry

A lot of the food I cook for myself at home happens to err on the side of 'healthier'... simply because when I eat out, working on food shows or testing recipes, I'm not exactly going to not the pasta special, spit when judging cheese soufflé, or say no to the foie gras parfait.

IMG_1229.JPG

This berry crumble recipe came about one recent cold night when I felt like something warm and comforting without wanting to go OTT on the indulgence factor. I like to keep frozen berries on hand for smoothies, and quick snacks because they're a great way to get a sweet hit without reaching for the chocolate every time (not to mention, they're a great antioxidant and vitamin boost).

This recipe happens to be gluten free, but if that doesn't bother you, you can always substitute with your favourite sweet biscuits (milk arrowroot or shortbread would be ACE!). If you're dairy free, feel free to replace the butter with coconut oil, but work quickly with your hands, so it doesn't melt completely.

Screen Shot 2017-10-11 at 10.58.16 pm.png

Serves 1 sweet fiend or 2 normal people

Ingredients

3-4 gluten free biscuits

2 tbs almond meal

A good knob of butter

1 pinch ground cinnamon

1 pinch sea salt

1 cup frozen mixed berries

A drizzle of honey

Method

Preheat your oven to 180c. Place the biscuits inside a clean tea towel and using a rolling pin or a heavy saucepan, bash the biscuits up into uneven, crumbly chunks (you could use a food processor, but that'd be far too civilised and quite frankly, you want chunks of biscuit to exist, rather than a fine, uniform crumb). In a bowl, rub together the crushed biscuits, almond meal and butter with your fingers until it comes together as a coarse crumb. Add in the cinnamon and salt and lightly combine. 

Pour the berries into an oven proof ramekin. Drizzle with honey and top with the crumble mixture. Bake for 10-15 minutes or until the top is golden and the berries are bubbling and juicy around the edges of the ramekin. Serve with Greek or coconut yoghurt...or a little double cream if you're feeling like taking it there.

Mum's Beef Rendang

Everyone has at least a couple of comfort food dishes that will, without fail make you feel better when you're sad, sick or just needing the gastronomic equivalent of a hug. Many of mine are deeply connected to my family's Singaporean roots, and include things like pork and century egg congee (with plenty of crunchy, fried wonton chips on top), pork and prawn wontons...and my mum's aromatic, spice-laden, fork-tender beef rendang. 

Beef Rendang mise en place

When I moved out of home during my university days, this recipe became a much called on heirloom for when I was homesick. Despite being a very basic cook at the time, I learned that 1. Making curry paste is a lot easier than you'd think to make. 2. Fresh curry paste tastes SO MUCH better than store bought (though there is no shame in using a good one in a pinch).

Equipment-wise, you will need:
1. A blender/food processor
2. A heavy based, oven friendlysaucepan with a tight fitting lid (a cast-iron pot like a La Creuset is perfect)


Serves 4, or more if it’s part of a feast!

Ingredients
Paste
1 tbs coriander seeds
2 thumb-sized pieces of fresh turmeric, peeled
1 generous knob of galangal, coarsely chopped
2 red eschallots, peeled and halved
6-7 bird's eye chillis (go according to your heat preference)
2 thumb-sized knobs of ginger, peeled and coarsely chopped
1 stalk of lemongrass, coarsely chopped
2-3 green shallots (scallions), trimmed and coarsely chopped
1 tsp white mustard seeds
1 cinnamon stick

1 tbsp black peppercorns
1 candlenut

The rest
1kg beef brisket (this is an adaptation of mine, mum would use oyster blade, chopped into chunks. You can also use beef chuck, lamb neck or shanks)
400ml tin coconut cream
2 tbs kecap manis

Brown sugar

Sea salt
3-4 waxy potatoes, peeled and chopped into chunks
                                                                                                                                         
To serve
1 lime, cut into wedges
1 kaffir lime leaf, very finely sliced (chiffonade, like this)
4-6 Brussels sprouts, finely shaved using a mandoline
Olive oil
Sea salt flakes
Fried shallots (they come in jars in the Asian aisle at the supermarket, or any Asian grocer)
Coconut rice


Method
Preheat the oven to the highest it will go. Blitz the paste ingredients in the blender until you achieve a paste. Add a few slugs of vegetable oil to the paste if it has issues combining. Place the meat onto a rack over a tray, and place in the oven for 15-20 minutes to seal. This is a neat way to sear meat when you’re braising a whole piece.

While the meat is searing, on a heavy based pot on a medium to high heat, add a generous slug of olive oil and stir fry the paste for 7-10 minutes, until aromatic and heavily caramelised. Continuously stir the paste, and keep scraping the caramelised bits off the bottom and incorporating it back into the paste. Add in the coconut cream and ketchup manis and combine well. Bring the curry to a simmer, then season with salt, ground white pepper and brown (or palm) sugar, to taste.

Transfer the beef to a deep oven dish, or an oven-friendly pot with a lid, like a French oven. Pour over the curry, cover and cook at 120c for 4-6 hours, or until the meat is starting to fall apart. In the last hour, add the potatoes, or any other veg you might want to throw in (I had eggplant in the fridge, so that's what’s featured here).

When it’s done, the meat should be soft enough to break apart with a spoon. If the meat is still a bit tough, place back in the oven for another half hour until tender. This is a saucier style of rendang, but feel free to decant the curry sauce and reduce it over the stove until thickened to your preference.

This is traditionally served at our house with coconut rice and maybe a squeeze of lime and topped with fried shallots, but this is your recipe now, so feel free to make it your own. This one features finely sliced Brussels sprouts and brown rice (don’t tell my mum).