Chicken, Ginger, Sweetcorn & Egg Drop Soup

As seen on Everyday Gourmet with Justine Schofield Season 8

As seen on Everyday Gourmet with Justine Schofield Season 8

There are certain dishes you need to learn when you move out of home and start cooking for yourself. I would highly advise 1. A good hangover cure (mine's a 3 cheese toastie with heaps of black pepper and Dijon mustard), 2. Something to impress any guest (a cracking roast chicken is a solid submission), 3. A mid-week no-brainer (my braised lentils with bacon as seen in Good Food)...and 4. A sick-remedy cure-all. 

While I've painstakingly perfected my Jewish Chicken Soup, I've evolved my mum's chicken and sweetcorn soup over the years for maximum ease (handy when you're the sick patient in question), speed (takes about 15 minutes all up) and deliciousness (even less than that to slurp down). It is, also ideal as a quick and healthy snack even if you're not ailing. 

Watch the how-to below!

Makes 4 serves

Ingredients

8 cups chicken or vegetable stock (bonus points if you make it yourself!)

4 chicken thighs, skin off

1 thumb sized knob of ginger, peeled and finely sliced

1 x 410g tin creamed corn

1 x 125g tin corn kernels

1 egg, lightly whisked

Sea salt flakes

White pepper

1 stalk spring onion (scallion), finely chopped into rounds

Sesame oil

Method

In a large pot, add the stock and ginger, then bring to a boil. Carefully add the chicken thighs and simmer for 15 minutes or until the chicken is tender and cooked through. Carefully remove the thighs and allow to cool slightly before handling, then coarsely chop, or shred the meat. Return the chicken pieces to the stock, then add the creamed corn and corn kernels. Bring the soup back to the boil and when it has reached a rolling boil, slowly pour in the egg mixture a little ribbon at a time, gently stirring through the soup as you go (the egg flowers will form while gently moving around the soup - too slow and you'll have a rubbery clump, too fast and you'll just have a cloudy soup). Continue until all the egg is poured into the soup. Season to taste with salt and white pepper, then remove the soup from heat to cool slightly before serving.

To serve, garnish with more white pepper, a few drops of sesame oil and the chopped spring onions. Feel the life flooding back into your body!

4 Ingredient No Bake Coconut Crack Bars

As seen on Everyday Gourmet with Justine Schofield and Melissa Leong

As seen on Everyday Gourmet with Justine Schofield and Melissa Leong

A new year rolls around, as does the guilt for potentially overdoing it between Christmas and New Years, even though it's probably worth the argument that it's really what you eat between New Years and Christmas that's more important. 

But anyway, I digress. Once the sugar high from all your favourite end of year desserts comes to an end (personally, I'm a pavlova and trifle girl), here's a slightly more virtuous afternoon tea accompaniment that's vegan as well as gluten, refined sugar and dairy free...but be warned, they are called Crack Bars for a reason. There is zero baking involved and the base recipe is just 4 ingredients (I don't count salt), which you can add your favourite toppings or ingredients like pepitas and raw chocolate (pictured), cacao nibs, dried fruit, etc. Enjoy! 

Ingredients

1 cup dessicated coconut

1/4 cup maple syrup (honey will work, but isn't vegan if that matters)

2 tbsp coconut oil, melted

1/2 tsp vanilla extract

1 pinch sea salt

Optional: a handful of pepitas, raw chocolate to drizzle. 

Method

Place the dessicated coconut into a mixing bowl. In a separate bowl, combine the melted coconut oil, maple syrup and vanilla extract. Add the wet ingredients to the dessicated coconut, along with a good pinch of sea salt and combine well. At this stage, you can add any additional  ingredients you like, for example, a handful of chopped nuts, cacao nibs, pepitas, or dried fruit.

Line a shallow baking tray with baking paper and press the mixture into a level rectangle shape, alternatively you can use silicon ice cube moulds. Freeze the pressed mixture for 10-20 minutes until set, then slice into portions, or pop out of the mould, if using. If you want to drizzle a little melted chocolate (raw or otherwise, I don't discriminate), this is when you'd do that (and let's be honest, when is a little extra chocolate a bad idea?).

Store refrigerated. 


Tom Yum Sausage Rolls

Adding a Thai twist to one of Australia’s favourite meaty pastries, lemongrass and ginger add zing, while the shrimp paste and coriander adds to that savour flavour we all love. Best of all, you already know this recipe…just add (tom) YUM!

Makes: About 16 rolls 

Preparation time: 15 minutes

Cooking time: 25 minutes

Chilling/freezing time: 20 minutes

Level of difficulty: easy

Ingredients

 500 g pork and veal mince

2 tbsp tom yum paste

1 small carrot, peeled and finely chopped

1 brown onion, peeled and finely chopped

1 stick celery, finely chopped

1 clove garlic, minced

1 tbsp potato starch

½ tsp ground white pepper

2 sheets frozen puff pastry, partially thawed

1 egg

Nuoc cham (or if you’re feeling super Aussie, sweet chilli) sauce, to serve

Method

In a large mixing bowl, combine the mince, tom yum paste, carrot, onion, celery, garlic, potato starch and white pepper and mix well with clean hands to combine until everything is emulsified. Throwing the mixture vigorously against the side of the bowl or on a clean bench top will help. Work quickly, keeping the mixture as cool as possible, then cover and refrigerate until needed. When you are ready to assemble, place a sheet of thawed puff pastry onto a clean surface and cut in half, lengthways.

Remove the sausage mixture from the fridge and roll a log about 2.5cm in thickness and place it lengthways onto the pastry, closer to one edge. Carefully roll the pastry, making sure the filling is snug to the pastry with no gaps, and seal the edge where the pastry meets with egg yolk. Set aside in freezer to allow the mixture to firm up.

Repeat until you have used all of the filling. When ready to cook, preheat the oven to 200˚C. Remove the sausage roll logs from the freezer and allow them to thaw slightly. Cut into desired size, brush with remaining egg yolk and place on a baking tray lined with baking paper.

Bake for 20 minutes or until the pastry is golden. Set aside to cool slightly, then watch them disappear!

Note

Tom yum paste can be found in the Asian aisle of most major supermarkets and Asian grocery stores. Because the paste is very salty, there’s no real need to season with additional salt. These sausage rolls work really from frozen to the oven, so make a batch ahead of time and just pop them in the oven when unexpected hungry visitors come calling.


Vegan Chocolate Mousse

Vegan Chocolate Mousse.jpg

Instagram is a wonderful thing for inspiration. It's also terrible for creating unrealistic expectations about everything from diet to body image, but that's a conversation for another time. A dear friend and chef Sharon Salloum from Sydney's Almond Bar (if you haven't been, you really should) recently posted a vegan chocolate mousse she had made. Being a chef and then running into health issues is never ideal, but it happens more than you think. Having to change what we eat out of necessity does create an opportunity to explore new things however, and while I could never EVER be vegan, that isn't to say that recipes that don't involve animal products can't be delicious. Case in point, this extremely rich and velvety chocolate mousse. Chances are you already have most of these ingredients at home anyway, so why no, eh?

Serves 2

Ingredients

1 ripe avocado

1/2 frozen banana

2 tbs cacao powder

1 tbs vanilla protein powder (I used Tropeaka Lean Protein, but this isn't a sponsored post)

1 tsp maple syrup or rice malt syrup (you could use raw honey for a vegetarian option if you don't want to go fully fledged vegan)

1 pinch sea salt

1 tbs coconut yoghurt or almond milk (optional, if the ingredients get a bit too thick to blend)

Cacao nibs and other fun things, for garnish

Method

Throw all your mousse ingredients into a high speed blender. Blitz until smooth (here's a recipe where 'rustic' chunks of avo probably aren't so appealing). The frozen banana means the mousse is pretty much ready to eat out of the blender, but I recommend decanting it into a bowl and chilling it in the refrigerator for about 20 minutes or until ready to eat. Garnish with your favourite toppings and a little extra pinch of sea salt. 


Lentils with Bacon, Chilli Oil and Fried Shallots

As published in Good Food

As published in Good Food

It can be so tempting these days when you're feeling lazy and hungry, to pick up the phone, tap on an app and order delivery. It's not bad, and there are definitely times where the convenience of take out can really save you. There is something to be said though, for developing an arsenal of super fast recipes that you can whip up at a few minute's notice, and let's be frank, are probably a lot healthier and more satisfying than take out. 

Good Food Story September 2017

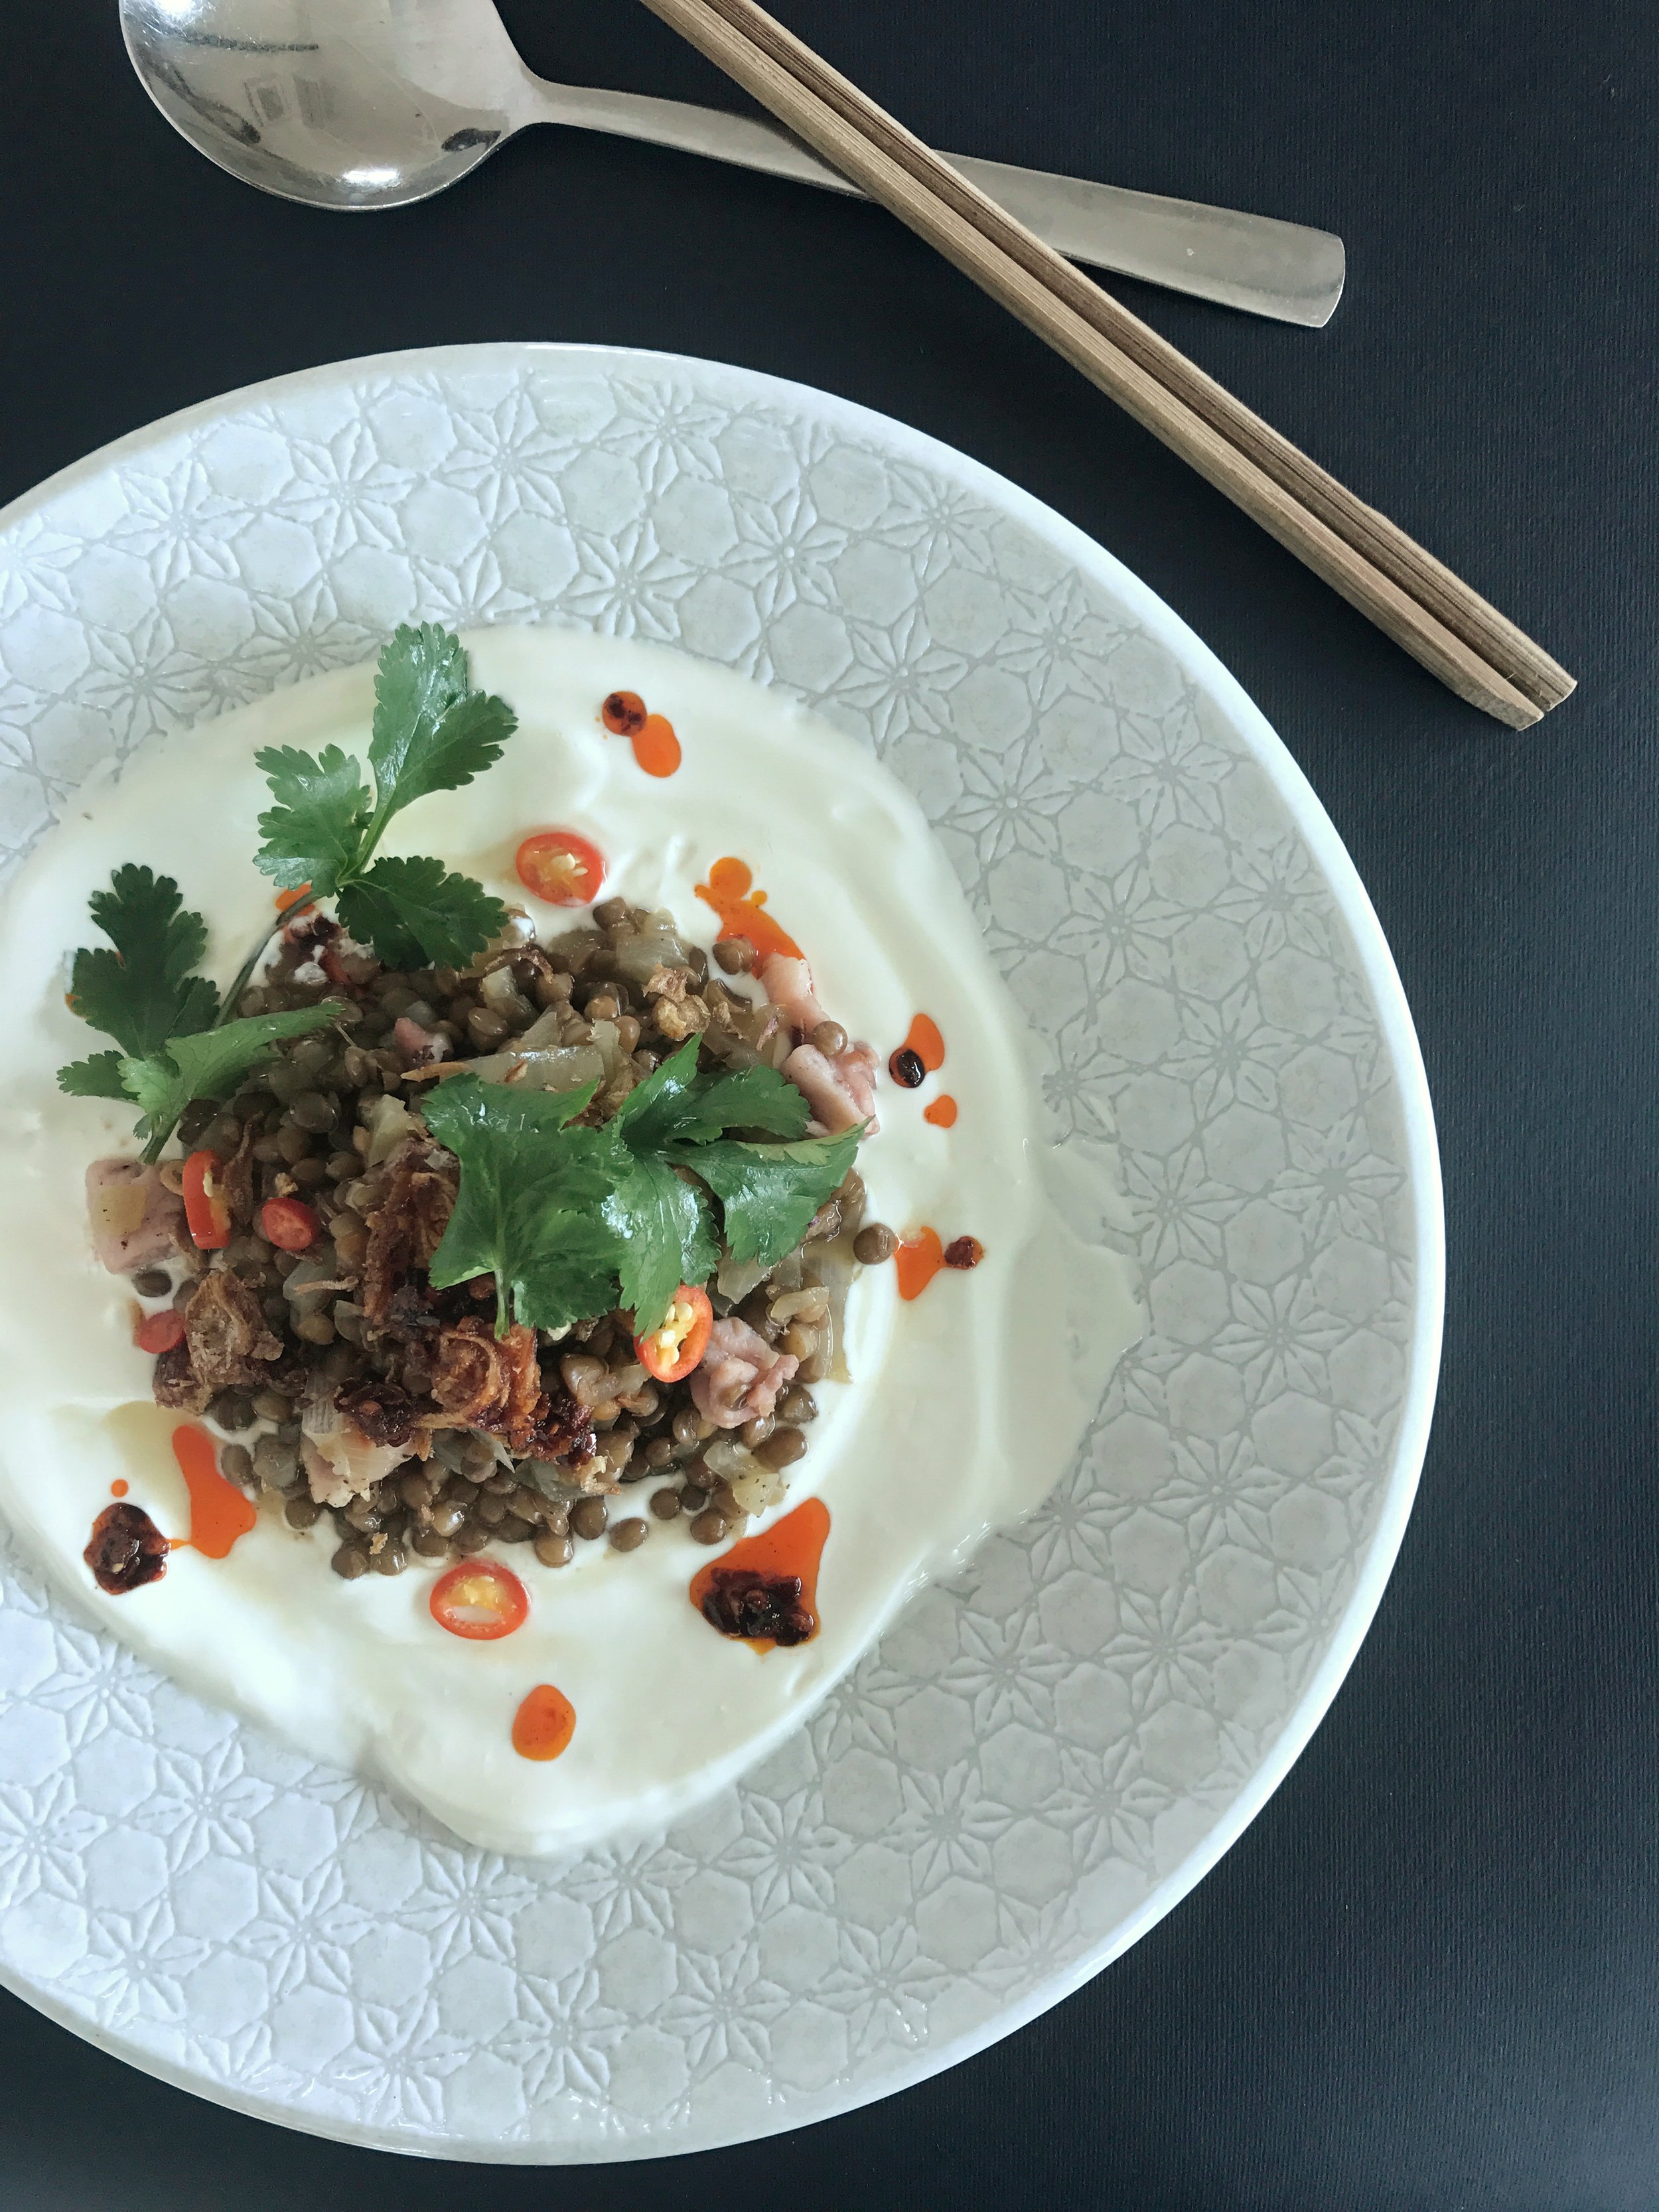
I was recently asked for Good Food what I'd do with a tin of lentils... so here 'tis! It takes about 10 minutes from go to whoah and is full of protein, fibre and of course, a tonne of flavour. 

Ingredients

1/2 brown onion, peeled and finely diced

1-2 cloves garlic, minced

1 rasher bacon, diced

1 tin lentils, drained and washed

1 cup chicken stock

2 tablespoons Greek yoghurt

1 teaspoon chilli flakes in oil

Fried shallots for garnish

Coriander leaves for garnish

In a frying pan on medium heat, sweat the onion, bacon and garlic in a little olive oil for 2 minutes or until the onion is translucent. Add the lentils and stir to combine everything. Pour in the stock, reduce the heat to low and allow to simmer for 5 minutes or until the stock has mostly evaporated. Set aside to cool slightly. On a serving plate, spread the yoghurt over the base, the spoon over the lentils. Top with the fried shallots and chilli oil and coriander leaves and serve.

Marmalade and Ricotta Teacake

Marmalade Ricotta Cake.jpg

When I lived in rural Tasmania for two years, I had the great fortune of living for part of that time on an organic sheep dairy. Owned by my dear mate Nicole Gilliver, her mother Diane Rae and their amazing family, Grandvewe Cheeses is situated in Birchs Bay, located an hour south of Hobart overlooking Bruny Island. 

One of the perks of being mates with a cheesemaker...is obviously access to cheesy delights...including recently, a huge wedge of sheep milk ricotta. With zero preservatives, the shelf life of produce like this is extremely short, and without wanting to waste it, I decided to bake what I didn't use into a ricotta cake. Add to this a couple of tablespoons of my mother in law's excellent home grown cumquat and blood orange marmalade, this cake was made with a whole lotta love. 

It's a not-too-sweet, citrusy slice is great as an afternoon tea accompaniment and is even better served with a dollop of yoghurt or creme fraiche. 

Ingredients

250g fresh ricotta

2/3 cups caster sugar

2 large organic eggs

100g butter, melted

Zest and juice of 2 lemons

1/4 cup orange juice

1/4 cup almond meal

1 1/2 cups self raising flour, sifted

1 pinch salt

1 tsp ground cinnamon

2 tbs marmalade

Icing sugar, for dusting

Greek yoghurt or creme fraiche, to serve

Method

Preheat an oven to 180c. In a food processor, add the ricotta, sugar and eggs and blitz until smooth. Pour in the butter, lemon zest, lemon juice and orange juice and pulse again, to combine. In a clean mixing bowl, add the almond meal, flour, salt and cinnamon and stir to combine. Gently fold the dry ingredients into the wet ingredients, about a third at a time, until combined.

Line a 20cm spring form tin with baking paper and pour the batter into the tin. Shake to level and then carefully swirl in the marmalade, then even out the top. Bake for 35-40 minutes or until a skewer inserted into the centre comes out clean. Allow to cool for 10 minutes before releasing the cake from the springform, and rest on a rack until cool. Dust with icing sugar and serve with yoghurt or creme fraiche. 


Sticky Chai

IMG_1370.JPG

Let me start by saying that I am NOT an advocate of jumping on the superfood bandwagon. There are of course, ingredients that we know are better or worse for us, and as a food writer, identifying trends or the prevalence of a theme, ingredient or technique is part of the job and what makes something newsworthy (deservedly or not..ahem *cloud eggs*). 

Lately, turmeric has become a huge point of fascination in the western world, though anyone of Indian or South East Asian background might find it comical that this fantastic rhizome has reached 'superfood' status...we knew that already!

Whether fresh or dried, then powdered, this golden-hued wonder can be used in curry pastes, skincare preparations (a mixture of honey, greek yoghurt and turmeric powder makes a GREAT face mask) and gives rice a fragrant scent and a vibrant hue. Its benefits can be enjoyed in a multitude of ways, including soothing inflammation in the body (from arthritis to skin irritation), as a potent antioxidant as well as being anti-bacterial, anti-fungal. Turmeric also has a positive impact on cholesterol (any excuse to validate duck fat in my diet) and aids in digestion and gut health. 

This turmeric recipe is an excellent thing to make and store in your fridge as a paste - add a teaspoon of it to boiling water with a little honey to drink as a tea, brew it with almond milk as a latte, add it to your morning oats, you can even use it as a curry paste! PSA: speaking from personal experience, I would highly advocate wearing black when you cook with turmeric - it stains like crazy.


Ingredients

3-4 pieces of fresh turmeric (about 50g) (you can also use ground turmeric if you can’t find it fresh - about 1 heaped tsp)

1 large knob of fresh ginger, peeled (about 40g)

1 cinnamon quill (or 2 tsp ground)

1 tbs whole black peppercorns

5-7 green cardamom pods

3 star anise

1 whole nutmeg

4-5 whole cloves (or 1/2 tsp ground)

1 heaped tbs honey (you can use maple syrup to make this vegan, or if you prefer the taste)

A pinch sea salt

Method

In a pan on medium high heat, toast the dry spices until aromatic. Add the fresh turmeric and ginger and continue to dry toast for 2-3 minutes, then transfer to a blender (I use a Nutribullet). Blitz into a coarse mixture, the transfer into a bowl. Add honey and salt and combine well. Transfer to a sterilised jar or container and store in the fridge. To brew, heat 1 tsp of mixture per cup or your chosen milk in a small saucepan on the stove until aromatic. You can also add it to your favourite tea infused, top with boiling water and then add your chosen milk (I like oat milk for this), for creaminess. Sweeten to taste.


Gluten Free Gingernut Biscuit Berry Crumble

As seen on Channel 10's The Cook's Pantry

As seen on Channel 10's The Cook's Pantry

A lot of the food I cook for myself at home happens to err on the side of 'healthier'... simply because when I eat out, working on food shows or testing recipes, I'm not exactly going to not the pasta special, spit when judging cheese soufflé, or say no to the foie gras parfait.

IMG_1229.JPG

This berry crumble recipe came about one recent cold night when I felt like something warm and comforting without wanting to go OTT on the indulgence factor. I like to keep frozen berries on hand for smoothies, and quick snacks because they're a great way to get a sweet hit without reaching for the chocolate every time (not to mention, they're a great antioxidant and vitamin boost).

This recipe happens to be gluten free, but if that doesn't bother you, you can always substitute with your favourite sweet biscuits (milk arrowroot or shortbread would be ACE!). If you're dairy free, feel free to replace the butter with coconut oil, but work quickly with your hands, so it doesn't melt completely.

Screen Shot 2017-10-11 at 10.58.16 pm.png

Serves 1 sweet fiend or 2 normal people

Ingredients

3-4 gluten free biscuits

2 tbs almond meal

A good knob of butter

1 pinch ground cinnamon

1 pinch sea salt

1 cup frozen mixed berries

A drizzle of honey

Method

Preheat your oven to 180c. Place the biscuits inside a clean tea towel and using a rolling pin or a heavy saucepan, bash the biscuits up into uneven, crumbly chunks (you could use a food processor, but that'd be far too civilised and quite frankly, you want chunks of biscuit to exist, rather than a fine, uniform crumb). In a bowl, rub together the crushed biscuits, almond meal and butter with your fingers until it comes together as a coarse crumb. Add in the cinnamon and salt and lightly combine. 

Pour the berries into an oven proof ramekin. Drizzle with honey and top with the crumble mixture. Bake for 10-15 minutes or until the top is golden and the berries are bubbling and juicy around the edges of the ramekin. Serve with Greek or coconut yoghurt...or a little double cream if you're feeling like taking it there.